

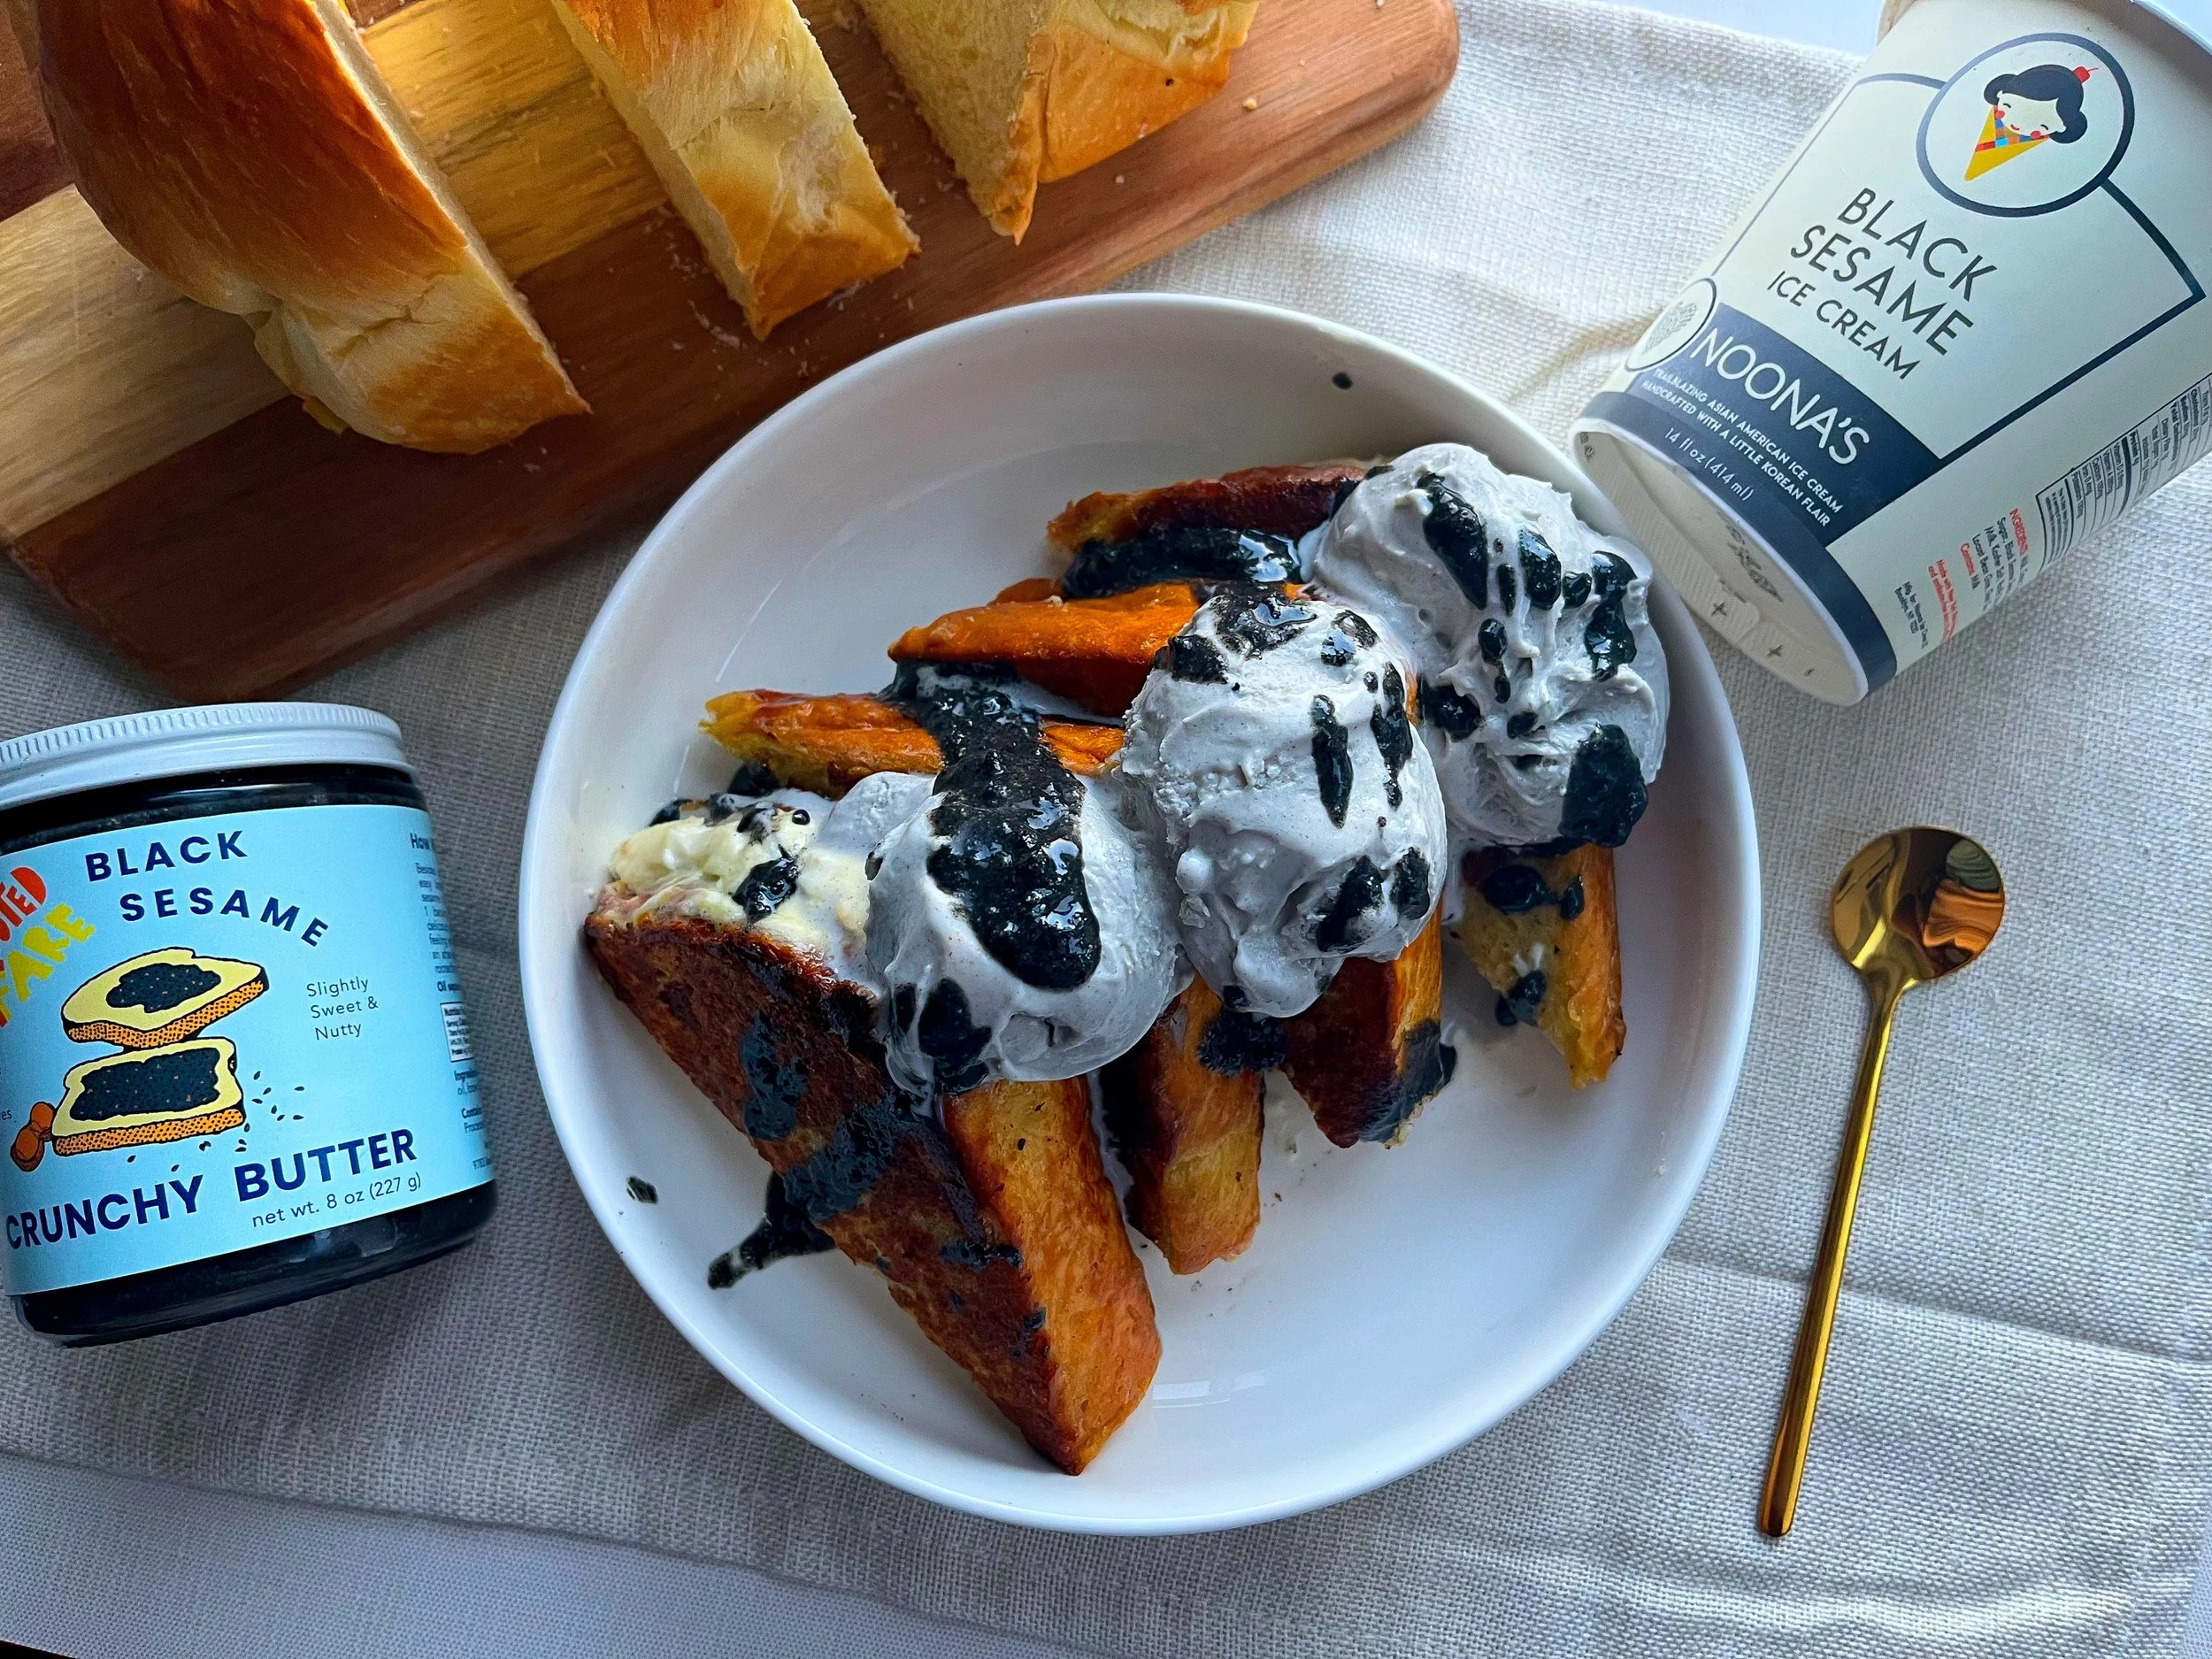
Noona's Ice Cream Stuffed French Toast
Noona’s Ice Cream Ricotta Stuffed French Toast! Topped with Noona's Black Sesame Ice Cream and Black Sesame Crunchy Butter.
with Noona’s Black Sesame Ice Cream
By: Jessica Delph
Who says you can’t have ice cream for breakfast? Deciding to add our Black Sesame Ice Cream to our breakfast today was perhaps the best decision we ever made before 10am. We highly recommend you do the same! Today, we’re in the kitchen making Ice Cream Stuffed French Toast, and we’re here to tell you you will never want to eat normal French toast again after trying this recipe.
If you love french toast and ice cream, bookmarking this recipe is a must! Not only did we conjure up a tasty recipe for breakfast, but we stuffed it with ricotta! The light and airy texture of ricotta along with its subtle tang makes it the perfect ingredient for our Ice Cream Stuffed French Toast.
To start, let’s make sure we have some Noona’s Ice Cream in the freezer. After ice cream, the most important ingredient is the BREAD! Brioche is highly recommended or a challah, since both have a tender crumb and a buttery sweetness that will add to this dish.
Let’s make this breakfast of champs dessert, shall we?
Ingredients
Serving size 1-3
2 eggs
1 pint of Noona’s Black Sesame Ice Cream
Two slices of brioche or challah bread
1 pinch of cinnamon
1 pinch of sea salt
1/3 cup of Ricotta
1 tsp lemon zest
1 tbsp Black Sesame Crunchy Butter
honey or maple syrup (optional, for drizzling)
How To Do It
Make a pocket or hole in bread by piercing the top of the bread with a knife gently ( the ricotta will be stuffed in here. Be careful not to cut too deep or you puncture our bread pocket.
2. Mix ricotta, sea salt, cinnamon and lemon zest and set to the side.
3. Crack eggs in a shallow dish.
4. Add 2 scoops of black sesame ice cream in a bowl and microwave for a 30 second burst until it is melted.
5. Whisk melted ice cream with the cracked eggs in the shallow bowl until and homogenous mixture forms.
6. Then, take a spoon and stuff the ricotta filling gently into the pocket we made in the bread earlier. Here is where you can stuff it to the brim or if you prefer a little less, adjust to your taste.
7. Next, melt some butter in a pan and turn stove on, medium heat.
8. Dip bread in eggy mixture gently both sides until it has soaked up enough egg.
9. Add soaked bread slices to heated pan.
10. Cook until golden brown on both sides, it is okay if some filling oozes out. This should take about 2-3 minutes on each side.
11. Transfer to a plate and either cut across to make sure little triangles or leave whole. The choice is yours.
12. Last but not least serve with copious scoops of Black Sesame Ice Cream. And our secret weapon that rounds out the dish is Rooted Fare’s Black Sesame Crunchy Butter. It’s luxury in a jar and a light drizzle of this along with honey or maple syrup will set you right for the rest of the day.
Dairy-Free/Vegan Version:
If you prefer dairy free, try substituting with our Vegan Black Sesame Ice Cream , and adding 1/2 cup of non-dairy milk to the mix! Cancel out the eggs, and substitute butter with coconut oi!. Enjoy.
Pro-tip:
Watch how it’s made, check out Noona’s Ice Cream TikTok account!
Noona's Magic Shell Topping
Noona’s Ice Cream Magic Shell Recipe. Our take on the classic ice cream topping, accompanied with Noona’s Matcha Green Tea Ice Cream.
with Noona’s Match Green Tea Ice Cream
By: Jessica Delph
Chasing down the Mr. Softee truck almost always ended in victory. Though I have to admit it was a little easier since our Mr. Softee driver has been serving up ice cream to my family for two generations now. My go to items were a cherry dipped cone and the cookies and cream dusted cone. Win win right?
What I did not know was how much of a rarity getting a cone from Mr. Softee would become as an adult. Slowly but surely I stopped seeing the truck as much and then one day it was like Mr. Softee perished all together. Especially with the happenings of self-quarantine, one would be more apt to order such delicacies home. What I also noticed since being homebound were an array of homemade ice cream topping recipes online!
While surfing the web, I noticed a bunch of homemade ice-cream topping recipes and we had to make one too for the books. This recipe is a chocolate magic shell, however you can substitute the chocolate chips for caramel chips or white chocolate chips, and flavor it even! It just takes two simple ingredients and the rest is just pure sorcery you’ll see.
Ingredients
2 tbsp of coconut oil, refined if you can (refined means less of a coconut taste if you prefer)
7 oz of chocolate chips
2-3 scoops of Noona’s Matcha Green Tea Ice Cream
How To Do It
First, combine oil and chocolate chips in a sauce pan and melt over low heat. It will not take long, as soon as everything is melted turn stove off and set aside in a bowl.
If using a microwave, place oil and chocolate chips in a microwave safe bowl and melt on high for 30 second bursts until an homogeneous mixture forms. Set aside to cool.
Scoop out as many or as little of our Matcha Green Tea Ice Cream that you desire. Once mixture has cooled or has come to room temperature( about 15 minutes), drizzle it all over ice cream.
You can quickly add nuts or any other toppings before it hardens, completely optional
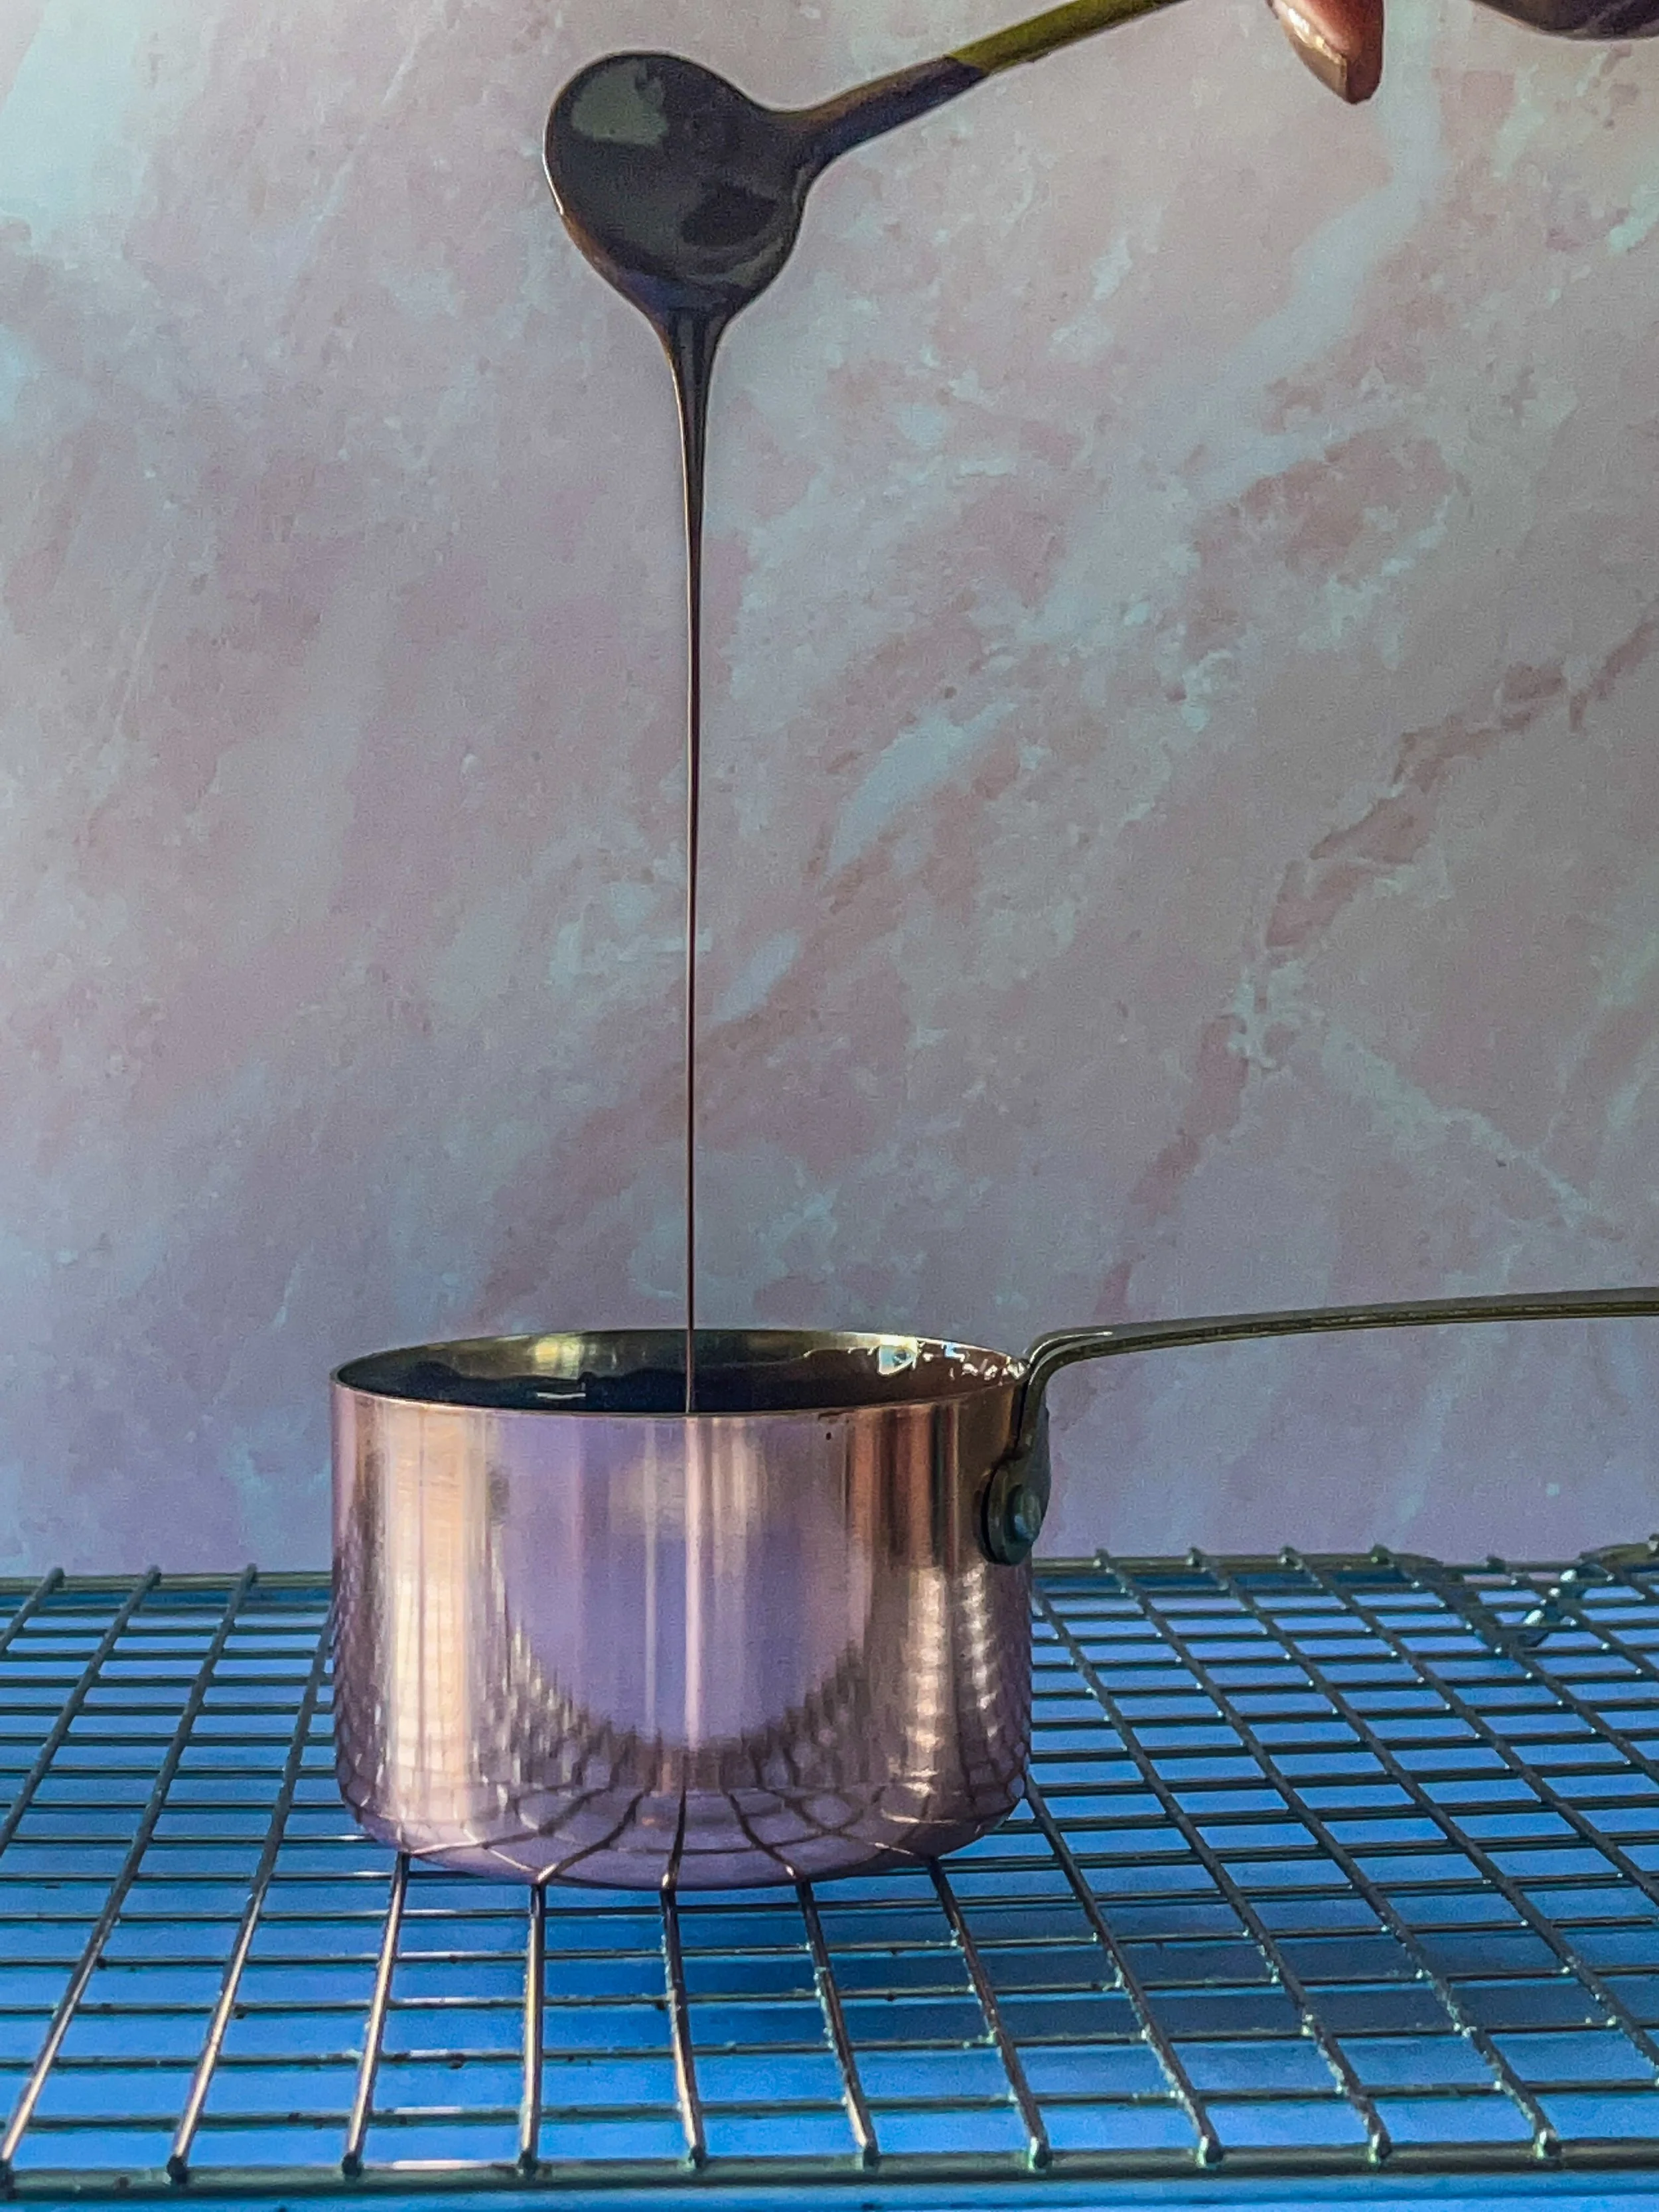
Now watch as the magic unfolds, the mixture should harden in about 30 seconds!
After it hardens, dig in and enjoy! The not so secret secret to this recipe is the ratio of chocolate to fat that adds to the delicate texture. This allows for it to be easily broken by the back of a spoon. When you are done serving, you can then stash the remaining shell mixture in a mason jar, stick it in the pantry and reheat anytime!
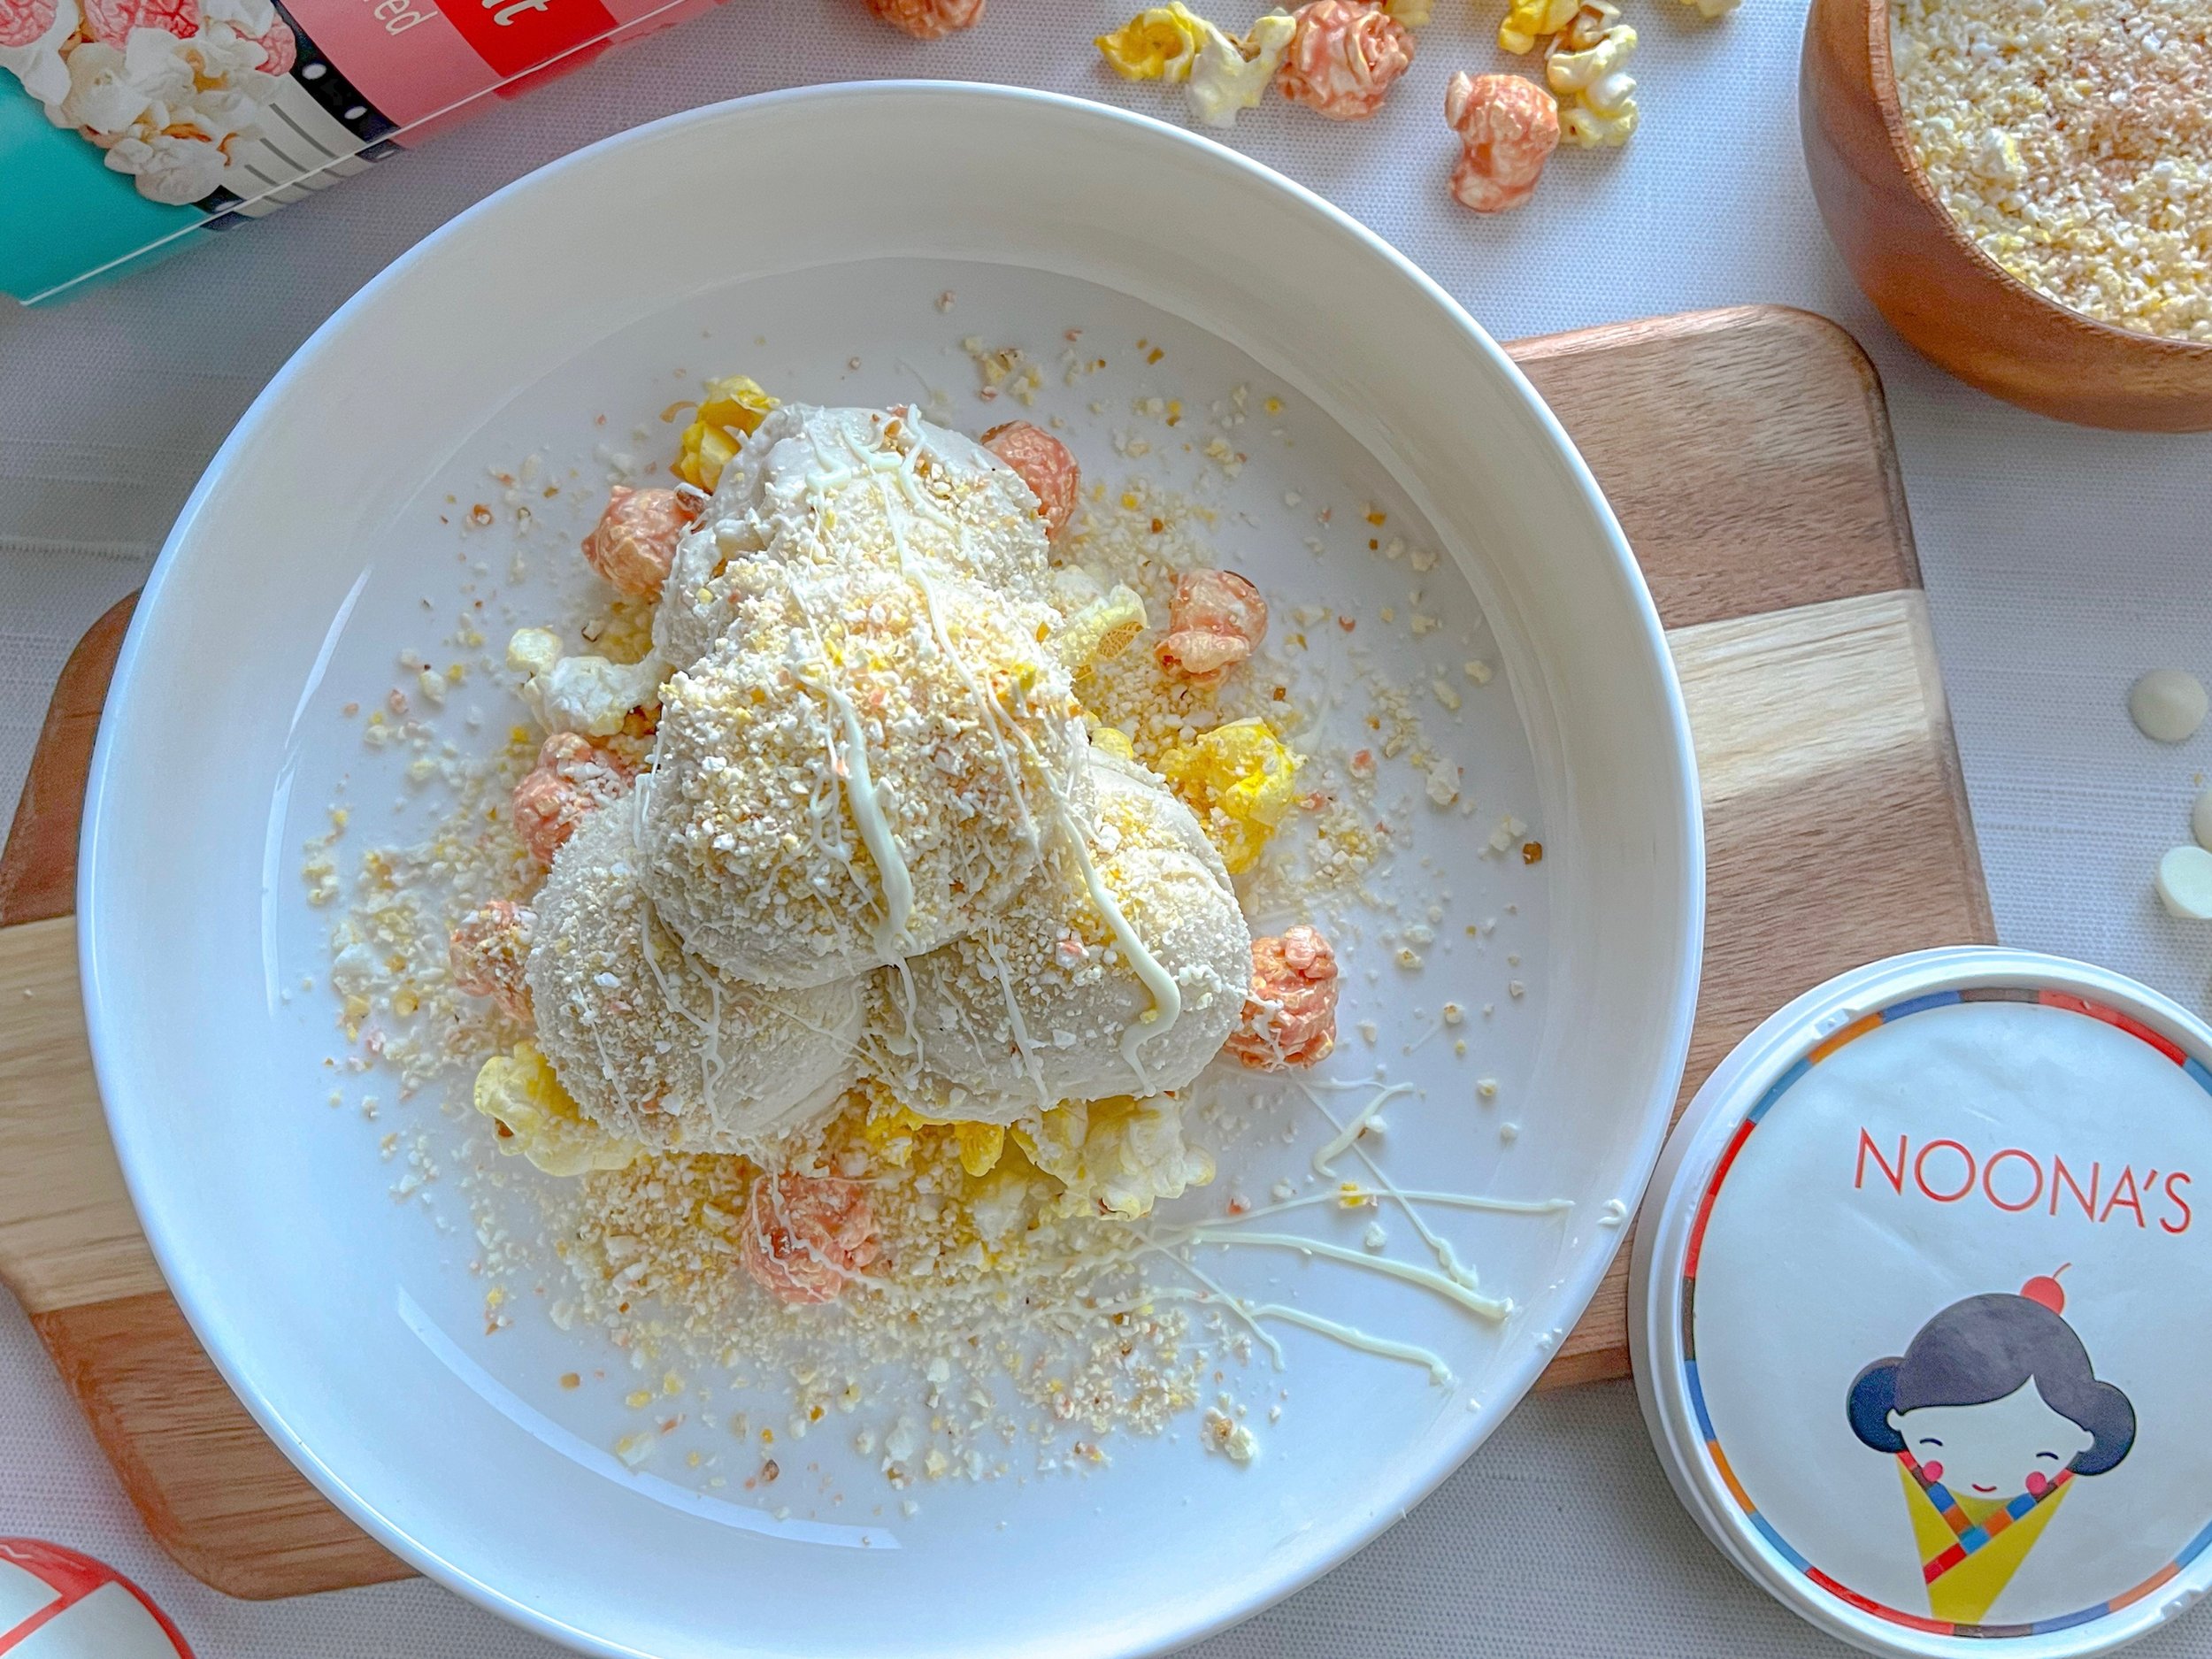
Noona's Popcorn Snow Topping
Noona’s Popcorn Snow Topping served with Noona’s Toasted Rice Ice Cream and chocolate drizzle.
with Noona’s Toasted Rice Ice Cream
By: Jessica Delph
The beginning of the year usually has my schedule pretty packed. With resolutions to uphold, birthdays to remember and holidays to celebrate. And with that, comes a few annual rituals that lead to quality time with loved ones. An opportunity for us to connect with one another. Of those family rituals, for some this includes cooking together, sharing a meal together, or watching holiday films.
With this recipe I wanted to connect two of my favorite bonding pastimes. That is movie viewing and eating; popcorn and ice cream more specifically. This recipe is super simple and includes two of my favorite things: popcorn and ice cream. I went through a phase where I could not tolerate getting small pieces of popcorn stuck in my teeth, and have found myself planted in the “I love you” popcorn section. No matter where you are on the spectrum, this recipe is perfect for you.
Lets go!
Tools
a blender, nutribullet will work perfectly
Ingredients
1 container of pre popped popcorn, like Smartfood caramel flavor
2-3 scoops of Noona’s Toasted Rice Ice Cream
5oz of chocolate chips to drizzle on top(or chocolate syrup)
How To Do It
With your popcorn, blend about 1 cup of it until it looks like snow. This takes about 30 seconds to a minute. Reserve it in a bowl
Microwave chocolate chips until melted. Melt it in 30 second bursts until uniform, then set aside.
Then, scoop as many or as little Toasted Rice Ice Cream into a serving bowl
Sprinkle your popcorn snow all over the ice cream, we used a brand called Cinema Popcorn found in our local Hmart. The flavor is strawberry and butter salt but any flavored popcorn will be great,
Lastly, drizzle chocolate all over snow!
Dig in and enjoy!
Pro-Tip: For some extra texture and fun, add some leftover whole popcorn to your bowl! It is highly recommend.
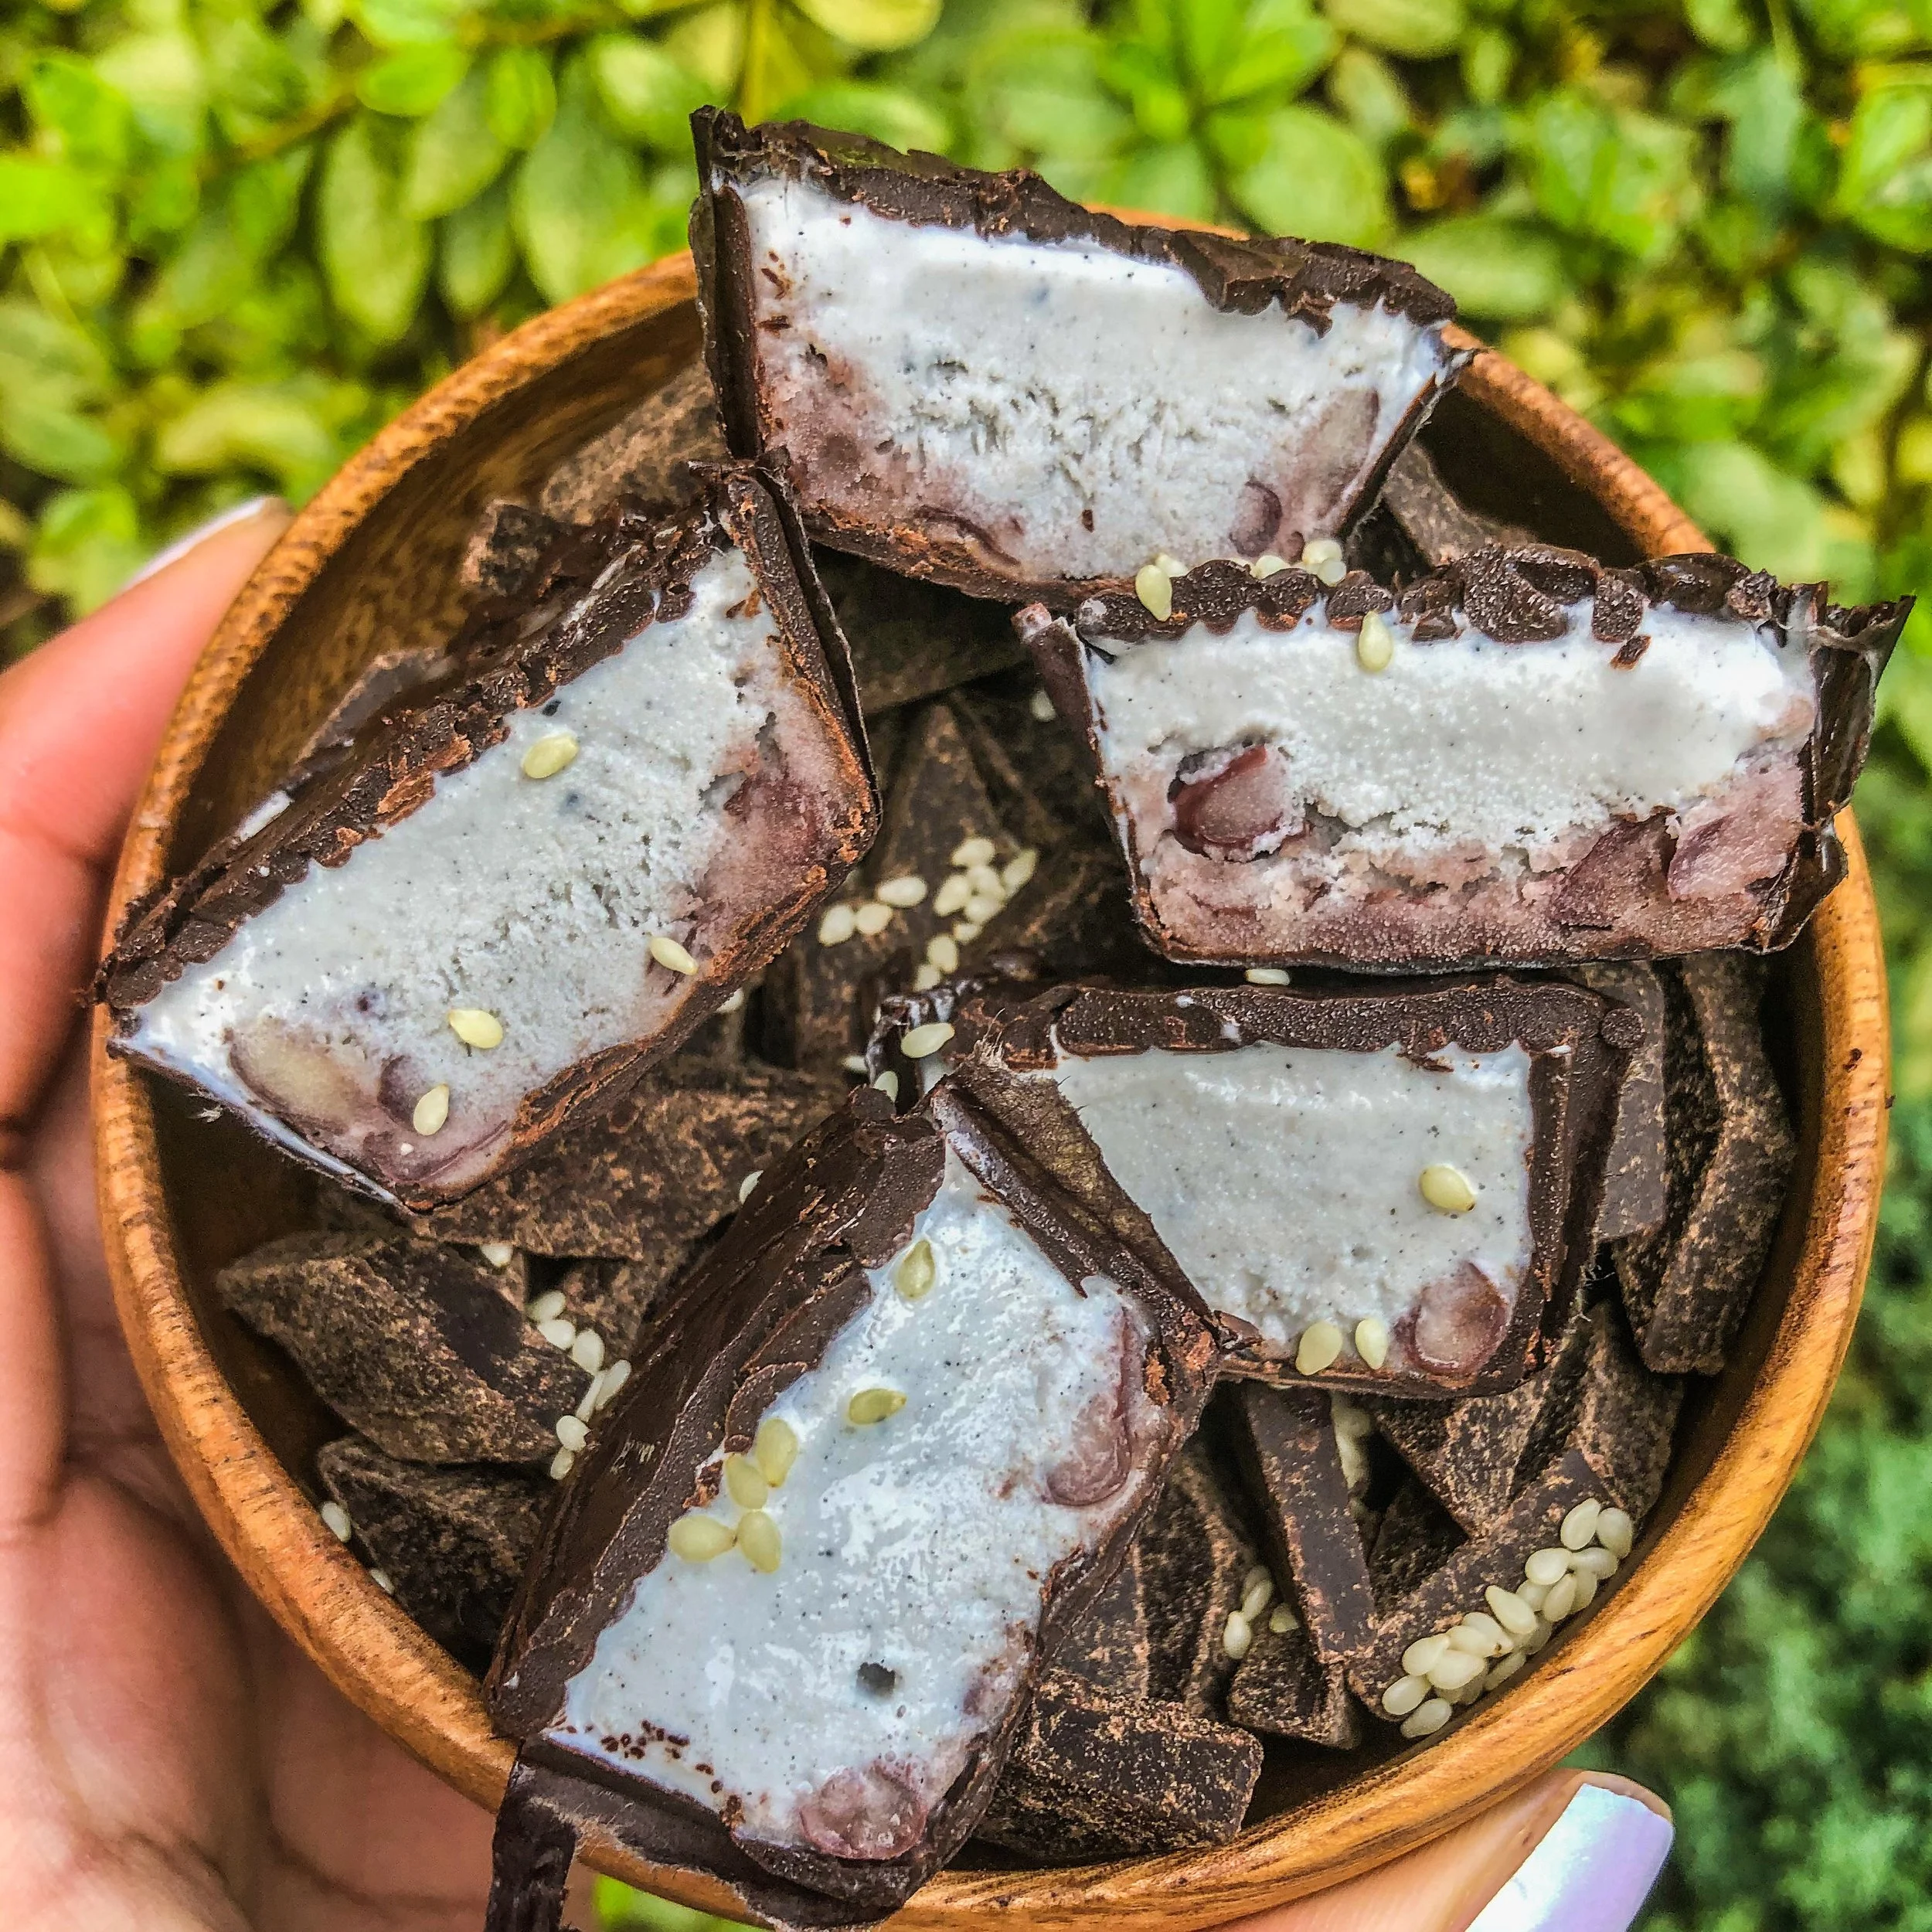
Noona's Black Sesame Bon Bons
Noona's Ice Cream Black Sesame Bon Bons. Recipe features Noona's Black Sesame Ice Cream.
with Noona’s Black Sesame Ice Cream
By: Jessica Delph
Okay, growing up, bon bons were not a household staple, they seemed to be reserved only for the occasional movie theater experience. What are they exactly? Ice cream bon bons are nibbles of delicious mounds of ice cream covered in chocolate. You win on two fronts, one being totally delicious ( no brainer) and two, no fuss and convenient. I’m not quite sure why bon bons were sensationalized at the movie theater, but there is something magical about watching a story and eating your favorite snack. Especially if it’s with loved ones.
Although there are variations of bon bons you can buy store-bought such as Dibs or ones at Trader Joes, you may find that making them at home tastes so much better. Who knows, they may even make you queue for your Netflix and Chill night. This recipe, using our black sesame ice-cream, has a thin layer of “anko” at the bottom. Anko is sweet red bean paste, or what you'll find in the center of many mochi snacks. You can find it pre-made in many asian markets or if you have time and adzuki beans you can make it at home ! This time, I highly suggest you go straight to your local H Mart and pick it up Sweet Red Bean
This 3-ingredient bon bon is simple and will have you craving more!
Ingredients
Yields 2 servings
1/2 pint of Noona’s Black Sesame Ice Cream
¼ of a cup of sweetened adzuki beans
½ to 1 cup of semi sweet chocolate chips
small sandwich sized ziploc bag
How To Do It
Pour ½ of chocolate chips in a bowl and we will temper the chocolate in the microwave or on the stovetop. I tried the microwave method and microwaved the chips for about 1 minute ( and then follow up with increments of 30 seconds until it is all melted. This depends on the strength of your microwave), mix with a spatula making sure the chips have melted evenly.
2. Pour the remaining ½ of chocolate chips in the melted chocolate to simulate tempering.
3. Set out liners on a small parchment lined cutting board or small baking sheet to prep.
4. Use the back of a spoon or tiny kitchen brush and push as much melted chocolate in the liner as you can. We want to make sure that the liner is covered in chocolate from the bottom and the sides, all the way to the top, leaving no nook or crannies empty.
5. You should end up with about 6-7 mini liners filled, you can then put the liners in the freezer to set for about 12-15 minutes.
6. To prepare, you will want to open up the can of sweet adzuki beans, take out a specified amount and store the rest in a container.
7. After 12 minutes, take out a pint of Noona’s Black Sesame Ice Cream first and then follow up with the liners!
8. Spoon a little of the sweet adzuki beans on the bottom of the liner and then follow up with the ice-cream and fill up each liner all the way to the top. What will dictate how much sweet beans you put is your preference. The beans add more of a creamy, nutty texture to the bon bon.
9. Smooth out the ice cream with the back of the spoon to ensure it is flat ( for the final layer of chocolate). Put back in the freezer while we temper the remaining chocolate.
10. Any remaining chocolate is going to be reheated and you will top off the bon bons. Place leftover chocolate in the microwave for 1 minute. Add any additional chips as needed, ¼ cup at a time.
11. Place melted chocolate in ziploc bag, squeeze all air out of bag pushing melted chocolate to one bottom corner of the bag, and close securely. Snip the tip of the bag with a scissors to create a make shift piping bag.
12. Squeeze the chocolate over the ice cream quickly “ pali-pali” (an expression which means “quickly” in korean) with the back of a spoon, Why ? The melted chocolate will solidify and set VERY quickly over the ice cream. Make sure you spread the chocolate over evenly.
13. Place back in the freezer, at this point you can pop them out in as soon as 5 minutes, wait until after dinner or even pop them in a ziploc bag and store overnight. Enjoy!
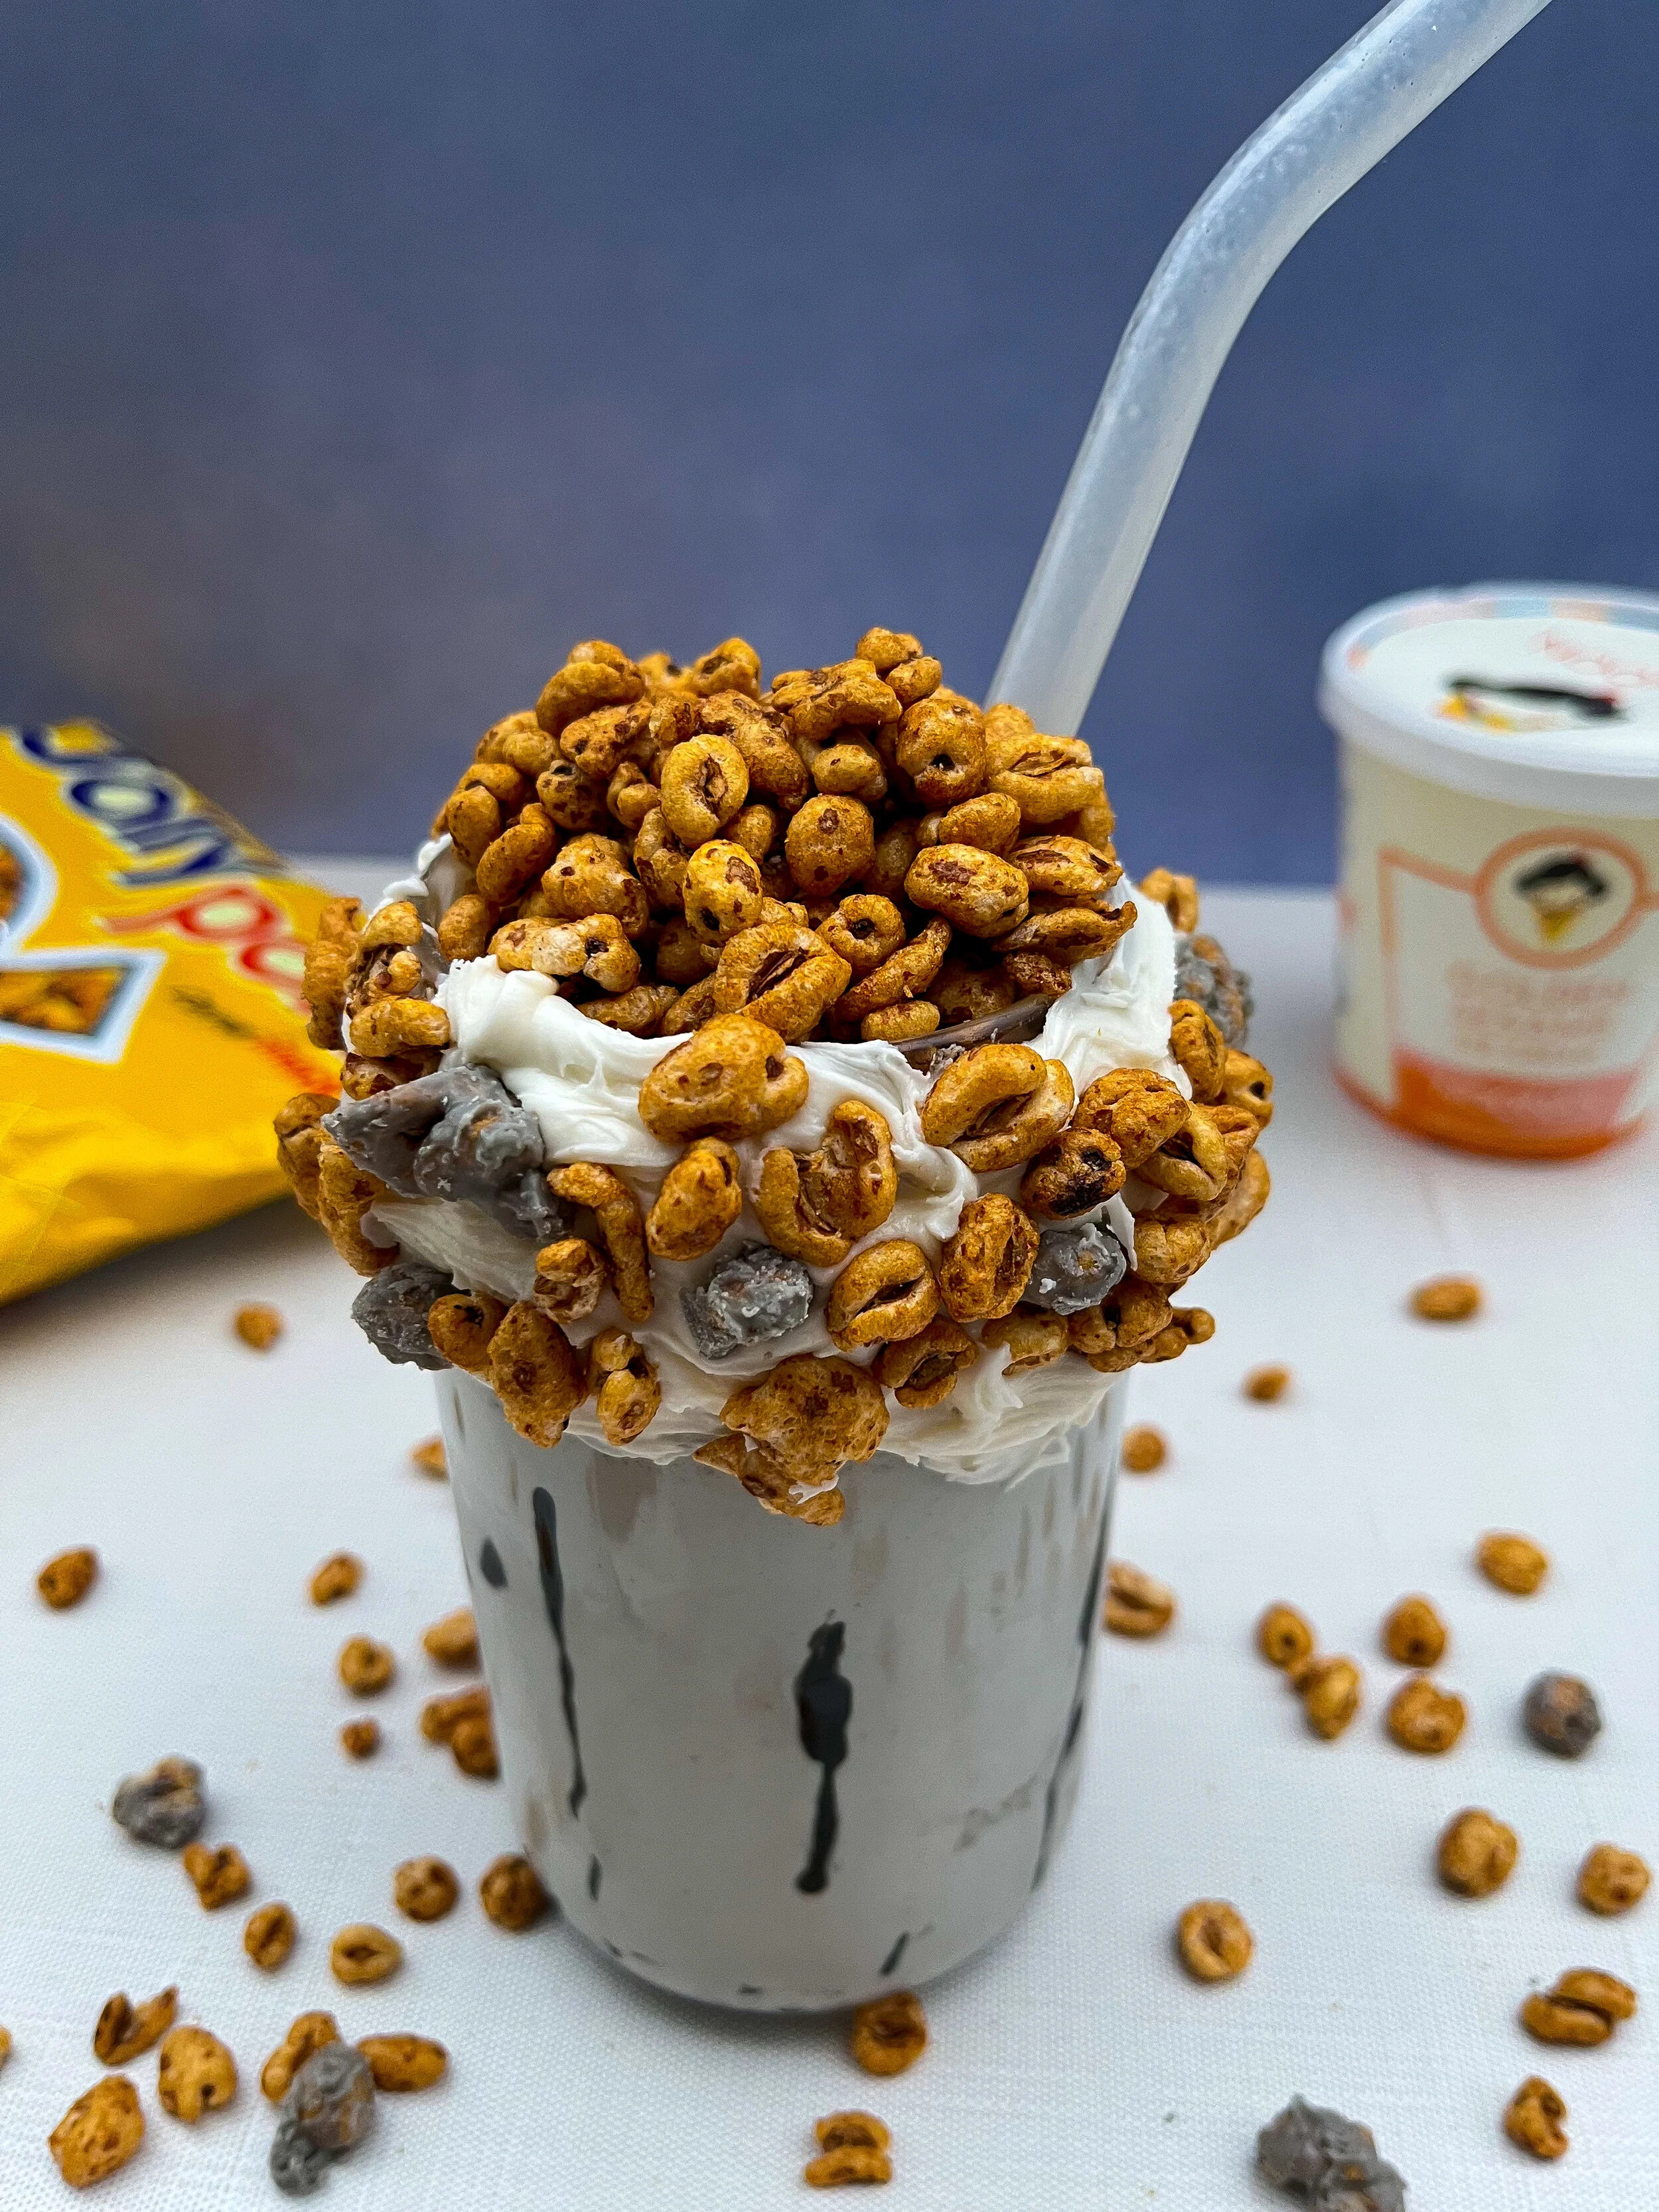
Jolly Pong and Black Sesame Milkshake
Noona's Ice Cream Jolly Pong Milkshake. This recipe features Noona's Black Sesame Ice Cream. Deliciously creamy and nutty.
with Noona's Black Sesame Ice Cream
By: Jessica Delph
Have you ever had that “gotta have it” snack as a child ? There were times when I was little that I would come home from school, and reach into the cupboard without even looking. I knew there would be oreos there waiting for me. Or for many of us that was Jolly Pong.
Jolly Pong is a highly revered Korean cereal snack made from puffed rice. It has a thin and subtle coating of sweetener. It can be eaten by the handful or a bowl chock full of milk. It slowly entered the parket in the 1970’s and steadfast became a childhood favorite. These staple snacks could be anything we needed them to be, a remedy for a long day, a treat after a good one or simply reaching for something familiar. This milkshake empcapesses all of that in a glass. With a little brainstorming I thought a creamy, classic milkshake made with Jolly Pong would taste amazing. You can find Jolly Pong in a local Hmart or on their website: Jolly Pong . The Jolly pong is extremely popular, it sells out quickly online however you can check other online delivery services if you do not have a local store near you.
What makes a “good” milkshake ? I’d say it's a pretty personal thing, like jolly pong. Milkshakes are very forgiving and completely customizable based on the person. You might prefer a thicker milkshake, or one who really likes copious amounts of add-ins like oreo cookies or someone who likes their milkshake on the thinner side. I prefer mine on the thicker side, you can adjust the recipe accordingly, based on your preference.
As a bonus, let's try making some Muddy Buddies ! Now, this is my first time making this as it is a pretty recent discovery. What it is, is cereal based coated in melted chocolate, nut butter, and powdered sugar. The ingredients can vary but those are the central points. For these muddy buddies I replaced the traditional peanut butter with black sesame paste.
Get ready to taste endless joy with every sip.
Ingredients
serving size 1
2 oz of milk or non dairy milk,
3 heaping scoops of Noona's Black Sesame Ice Cream orNoona's Golden Sesame Ice Cream
1 cup of jolly pong
Jolly Pong Muddy Buddy
4 oz of white chocolate chips
1 cup of jolly pong
1 tbsp of Organic Black Sesame Paste
1 tbsp of powdered sugar
How To Do It
First, to frost your glass, simply place it in the freezer to get it nice and cold.
Next, pour milk and jolly pong in a cup for a good soak, for 30 minutes to an hour.
While the jolly pong milk is sitting, grab your ingredients for “muddy buddies” microwave chocolate chips in increments of 30 seconds for 2 minutes total. After, with a spoon ( or chopstick ) mix the melted chips with the sesame paste. The color should be like a stone grey when mixed in evenly.
Pour Jolly Pong in and mix further. Once Jolly Pong is coated, the last step is to pour mixture in a ziploc bag with powdered sugar. Seal the bag and shake it until everything is coated with sugar.
You can pour this in a bowl while making the milkshake, because the Jolly Pong is light and airy. It tastes so delicious and refreshing. ( I snacked on a bunch while I was preparing to make milkshake).
Next, prepare the ice cream by placing it on the counter top for about 5 minutes before blending the ingredients together.
Scoop ice cream into the blender, add the Jolly Pong milk and whatever other mix-ins you'd like to the blender. Adding ice is not necessary, as it will water down the milkshake.
Pour milkshake in frosted glass and top with whipped cream, or in my case leftover muddy buddies Jolly Pong.
If you want to try “adulting”, replace milk with liquor of choice and enjoy !
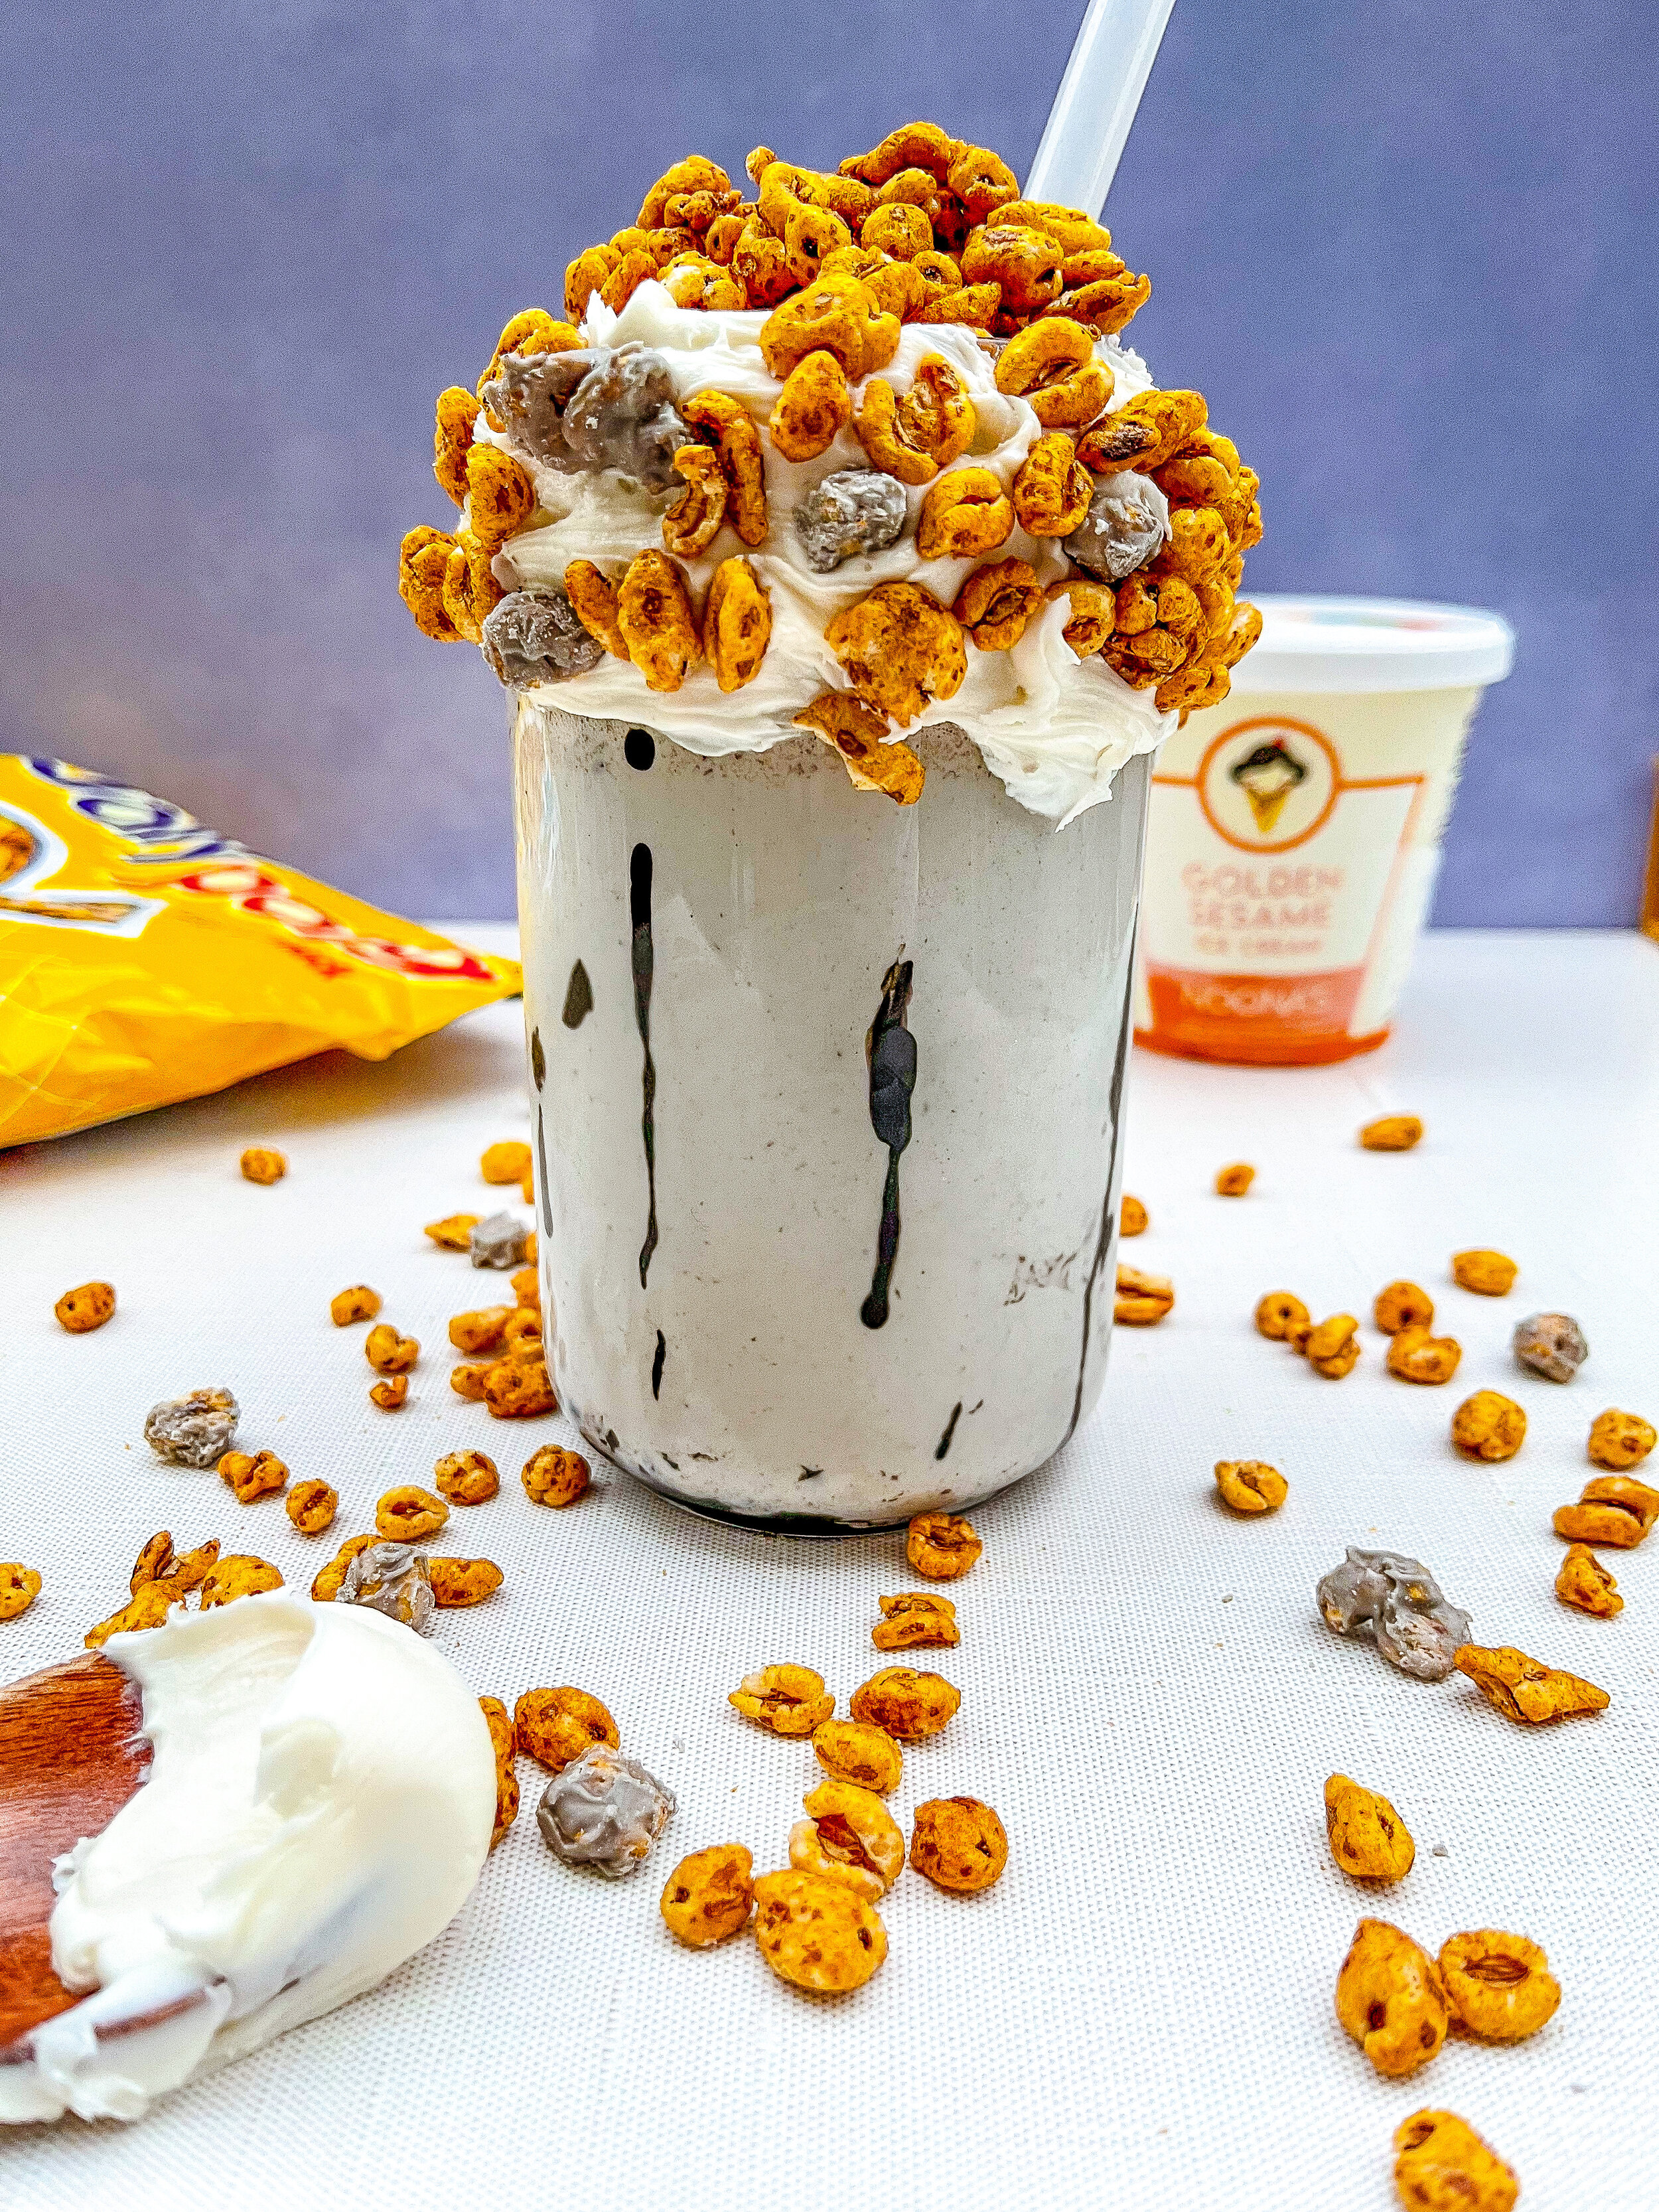
Jolly Pong and Noona’s Black Sesame ice cream milkshake adorned with black sesame muddy buddies !

Loaded Sweet Potatoes
Noona’s Ice Cream Loaded Sweet Potato Recipe. This recipe features a fan favorite Noona's Taro Ice Cream flavor!
By: Jessica Delph
What is the ultimate Korean comfort food ? How about a nice roasted sweet potato for your thoughts. Versatile in many ways this sweet succulent tuber has been a deep rooted favorite for years. Traditionally, the bam goguma variety of sweet potato ( chestnut sweet potatoes) are what you will find served in bars or roasting in drum cans on the streets of South Korea, but you can use whatever variety of sweet potato you have on hand, no worries. The beauty of this recipe is that the ingredients are easily accessible and when it comes to preparation, simple is always best. Now, let's make it the Noona way !
Ingredients:
yields 1 serving
3- 4oz of purple sweet potato, for recipe purposes any variation of sweet tubers will do.
1 Tbsp Condensed milk ( if not available you can sub with a little sugar or sweetener of choice and milk/non-dairy milk ).
Noona’s ice cream not just any flavor, the nutty and delicious Noona's Taro Ice Cream . How many scoops ? However many your eye allows.
Preheat oven to 375 ℉
Now, Here's What you Do:
1. Clean and scrub your sweet potato skin thoroughly before cooking. We are going to leave skin on for the bake. Pat dry and place on a parchment paper lined baking pan. When the oven is ready, take a fork and lightly poke holes all over the tiny tubers to make sure they are ventilated.
2. Then, bake sweet potatoes until tender for small to medium sized potatoes. This will take about 25-30 minutes. You will know it’s done when you start to see the natural sugars oozing out of it ( this is my favorite part, they are letting you know they are cooked !). If it is too hot in the summer to turn on the oven, do not fret !You can simply use an air fryer and set it at 400℉ for roughly 20 minutes.
3. Carefully take out potatoes from the oven, let cool. Slice partly down the middle (careful not to cut the potato in half fully) lengthwise and scoop out the potato meat. While still warm, mix the potato innards with condensed milk or substitutes, mix until potato has a nice whipped and smooth texture.
4. Place mixture back in the potato skin like you would with a double stuffed potato skin.
At this point, you have full permission to freestyle it. You can scoop copious amounts of yummy taro ice-cream and place on top or scoop out the inside of the potato entirely and mix it up with scoops of ice-cream in a bowl ! Enjoy the Lucious swirls of sweet potato and Noona’s Taro ice-cream.
Sweet potato has this creamy subtle sweetness and warmth that never goes unnoticed,and this treat can weather any season. It is magical, do yourself a favor and take your tastebuds on an adventure with this one. Try it out, let us know your favorite way.
Pro Tips:
Popping the tuber in the freezer first makes for a fun bake, the potato meat releases from the skin much easier !
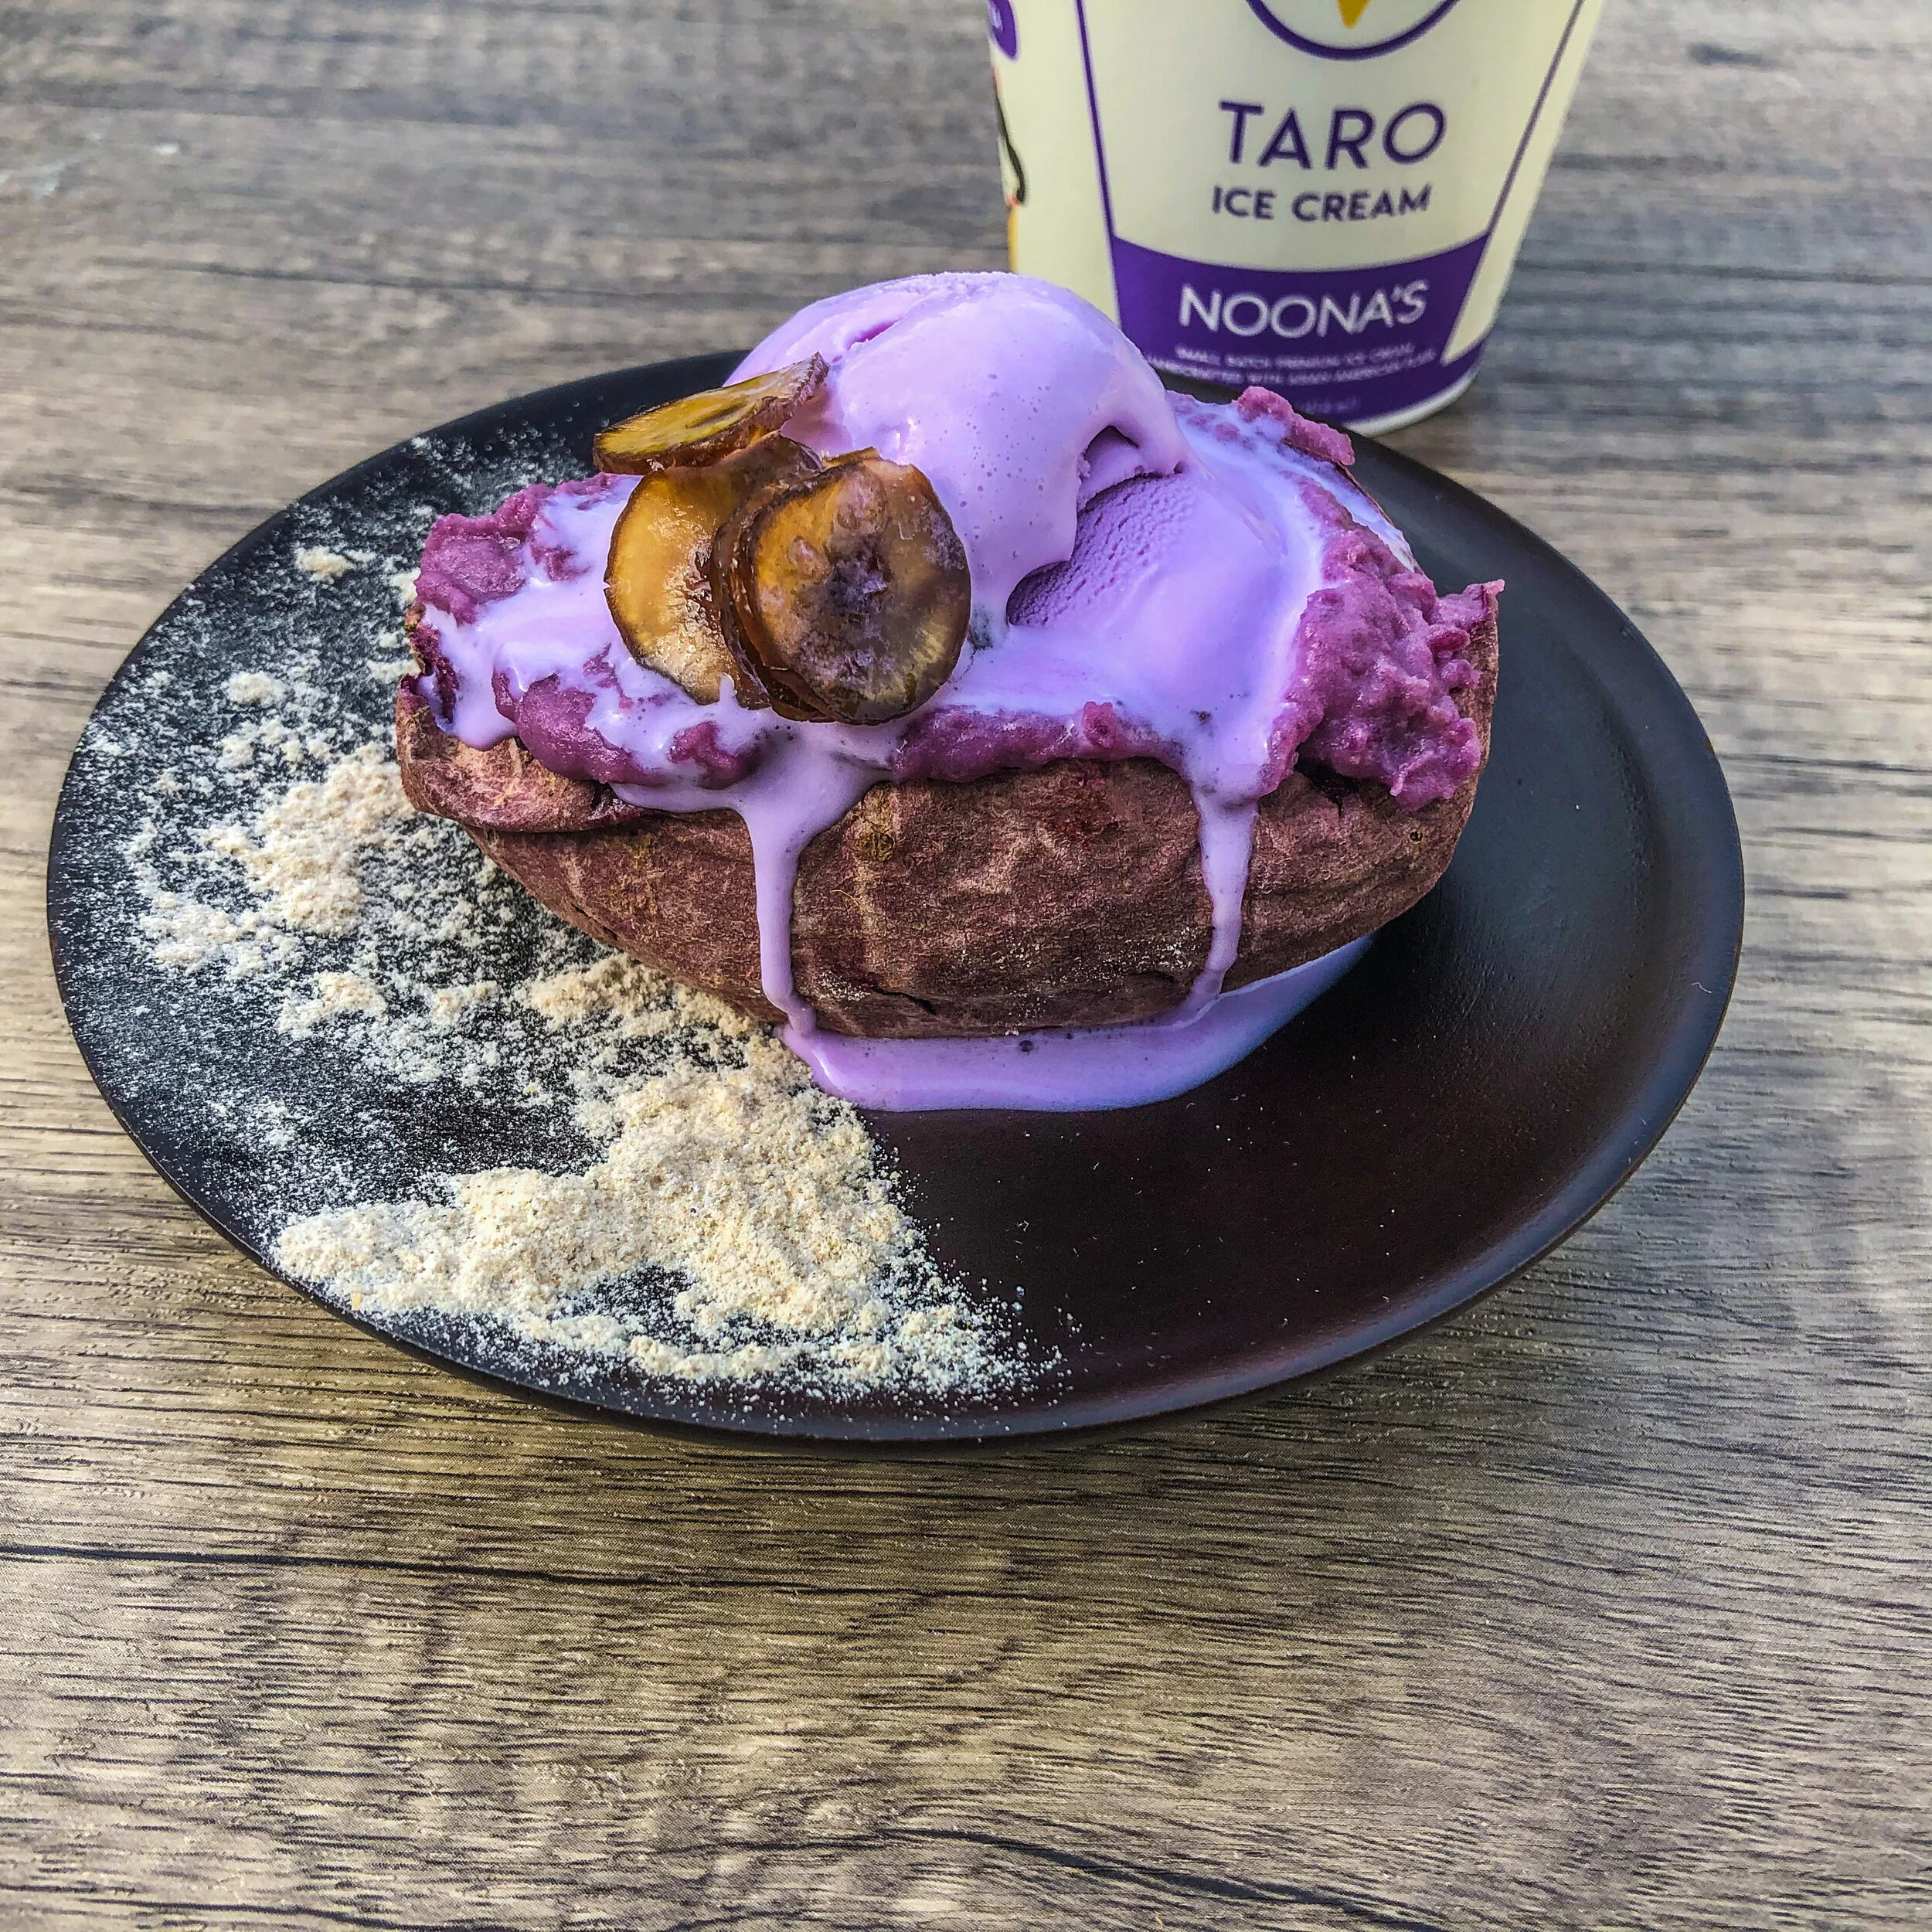
Roasted Purple Sweet potato stuffed with Noona’s Taro ice cream flavor and topped with candied chestnuts, the plate is dusted with roasted grain powder for dipping.
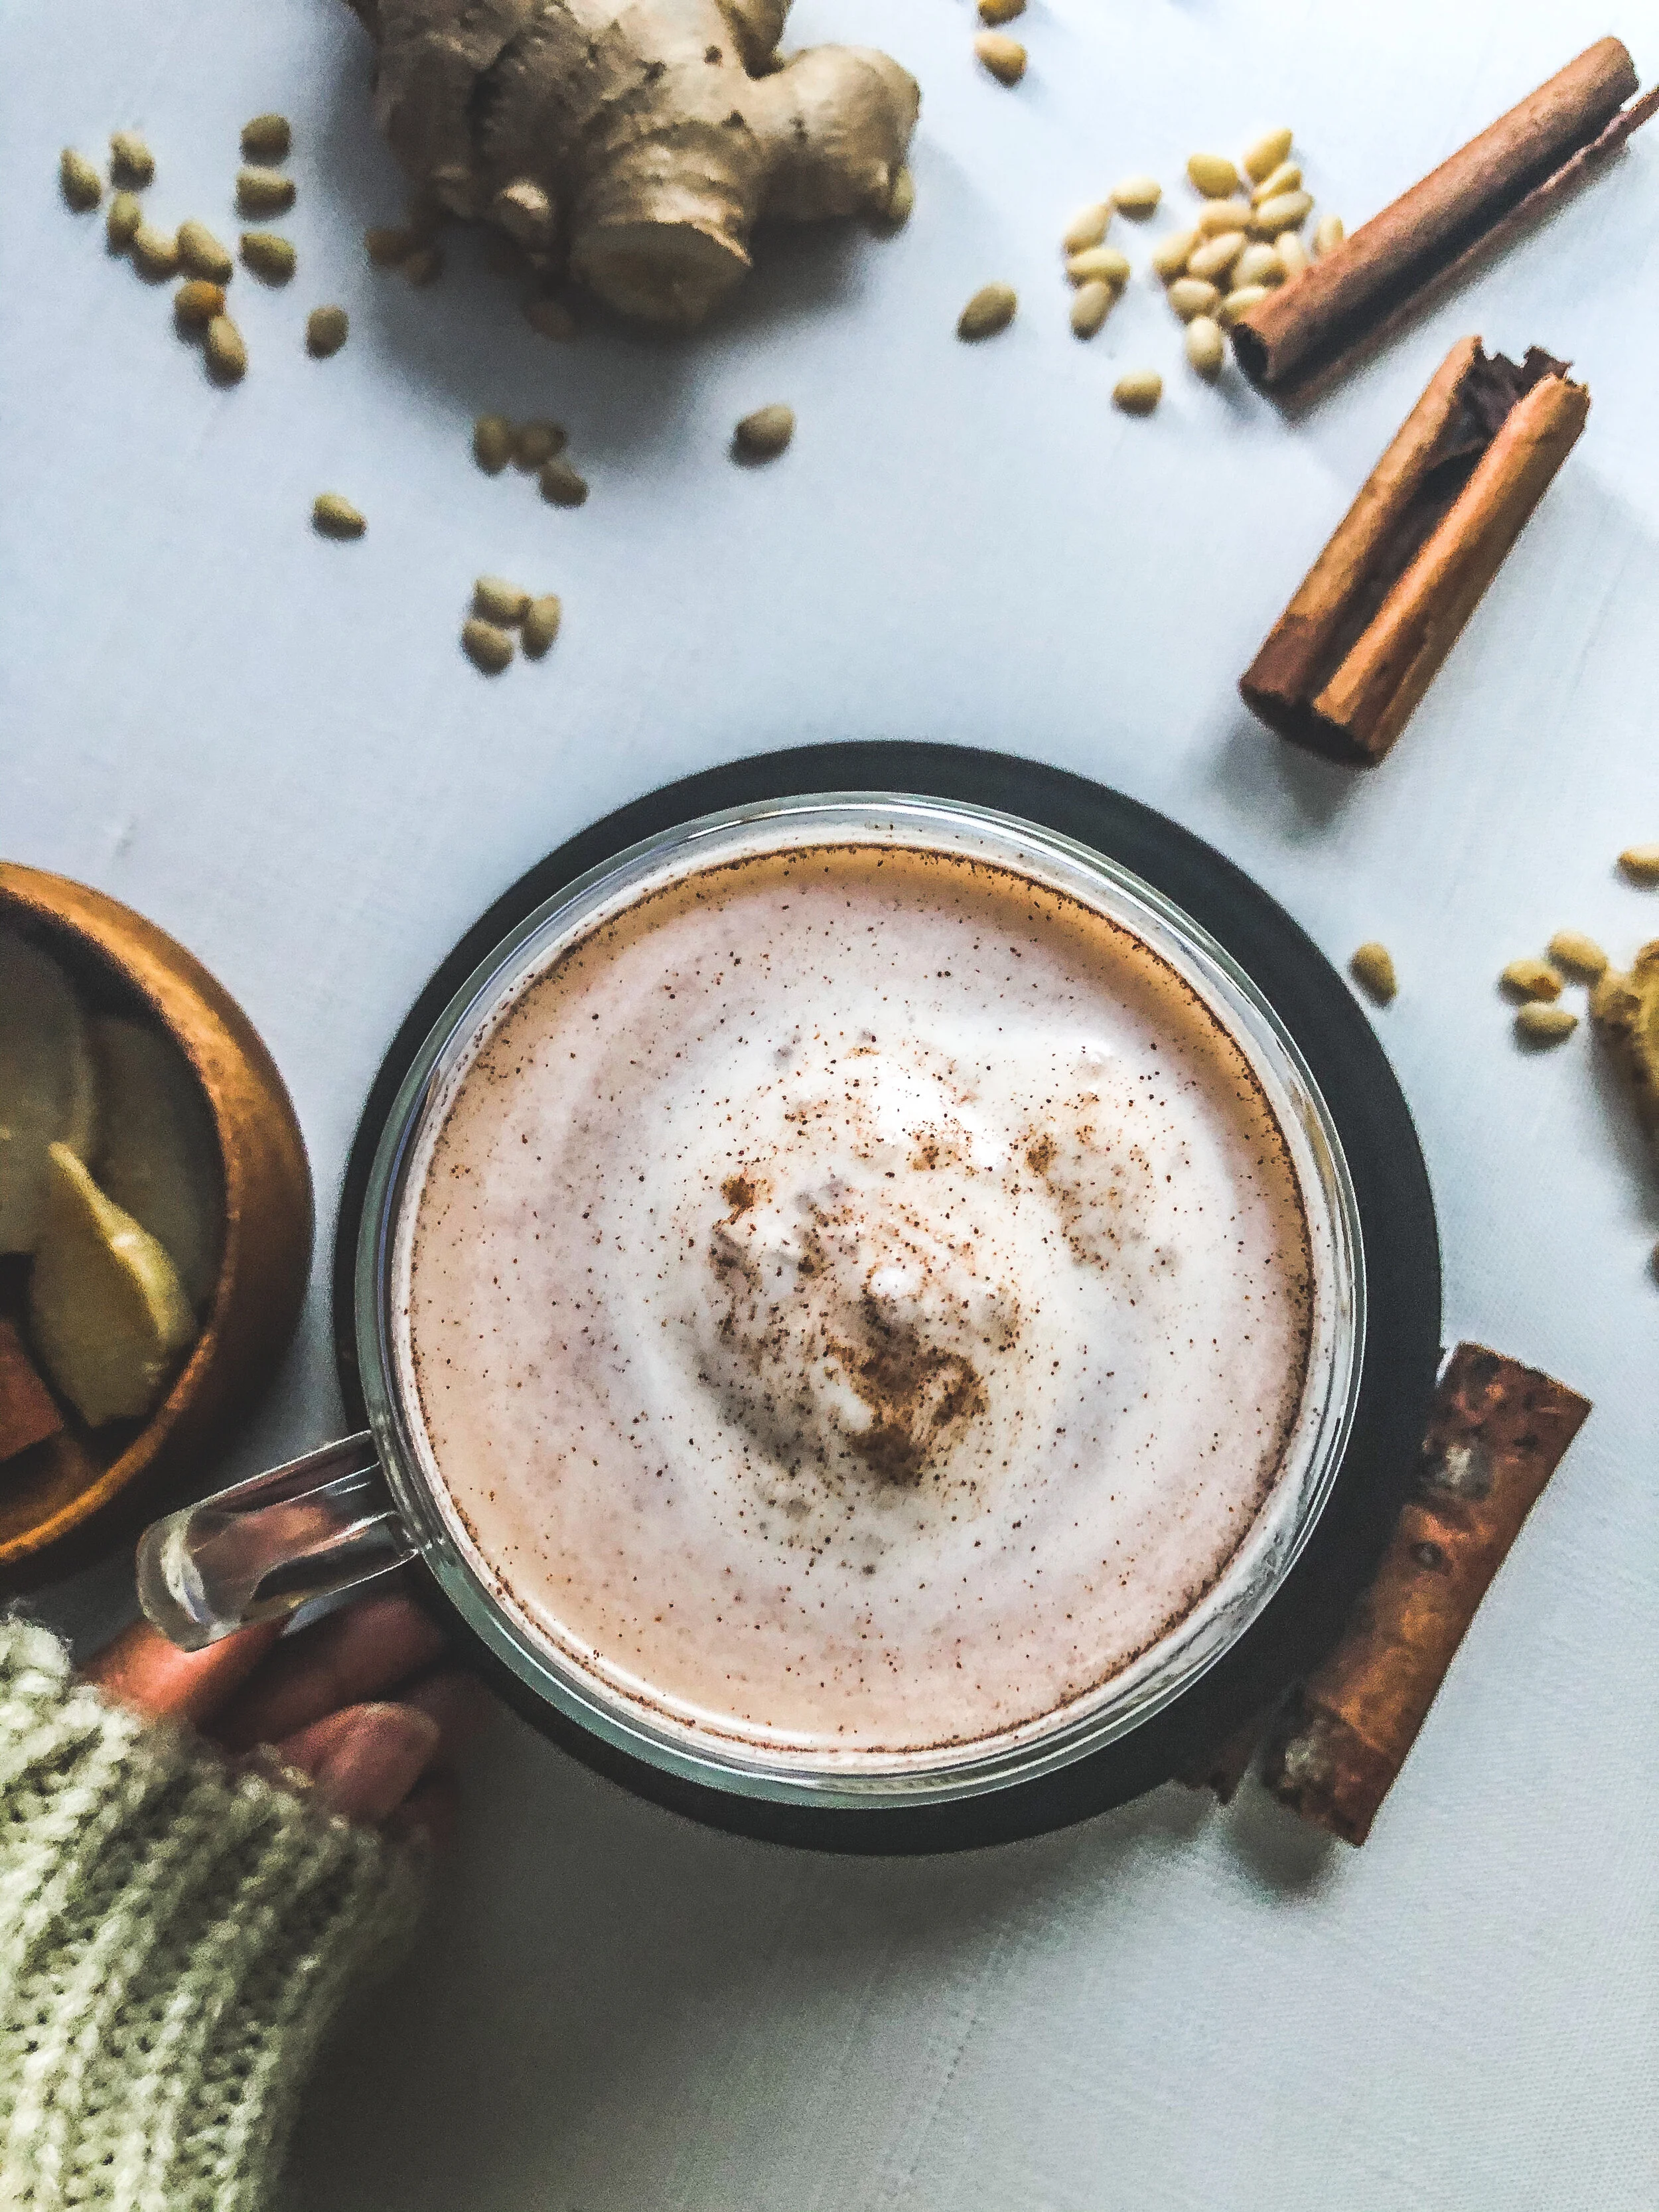
Chuseok with a Punch
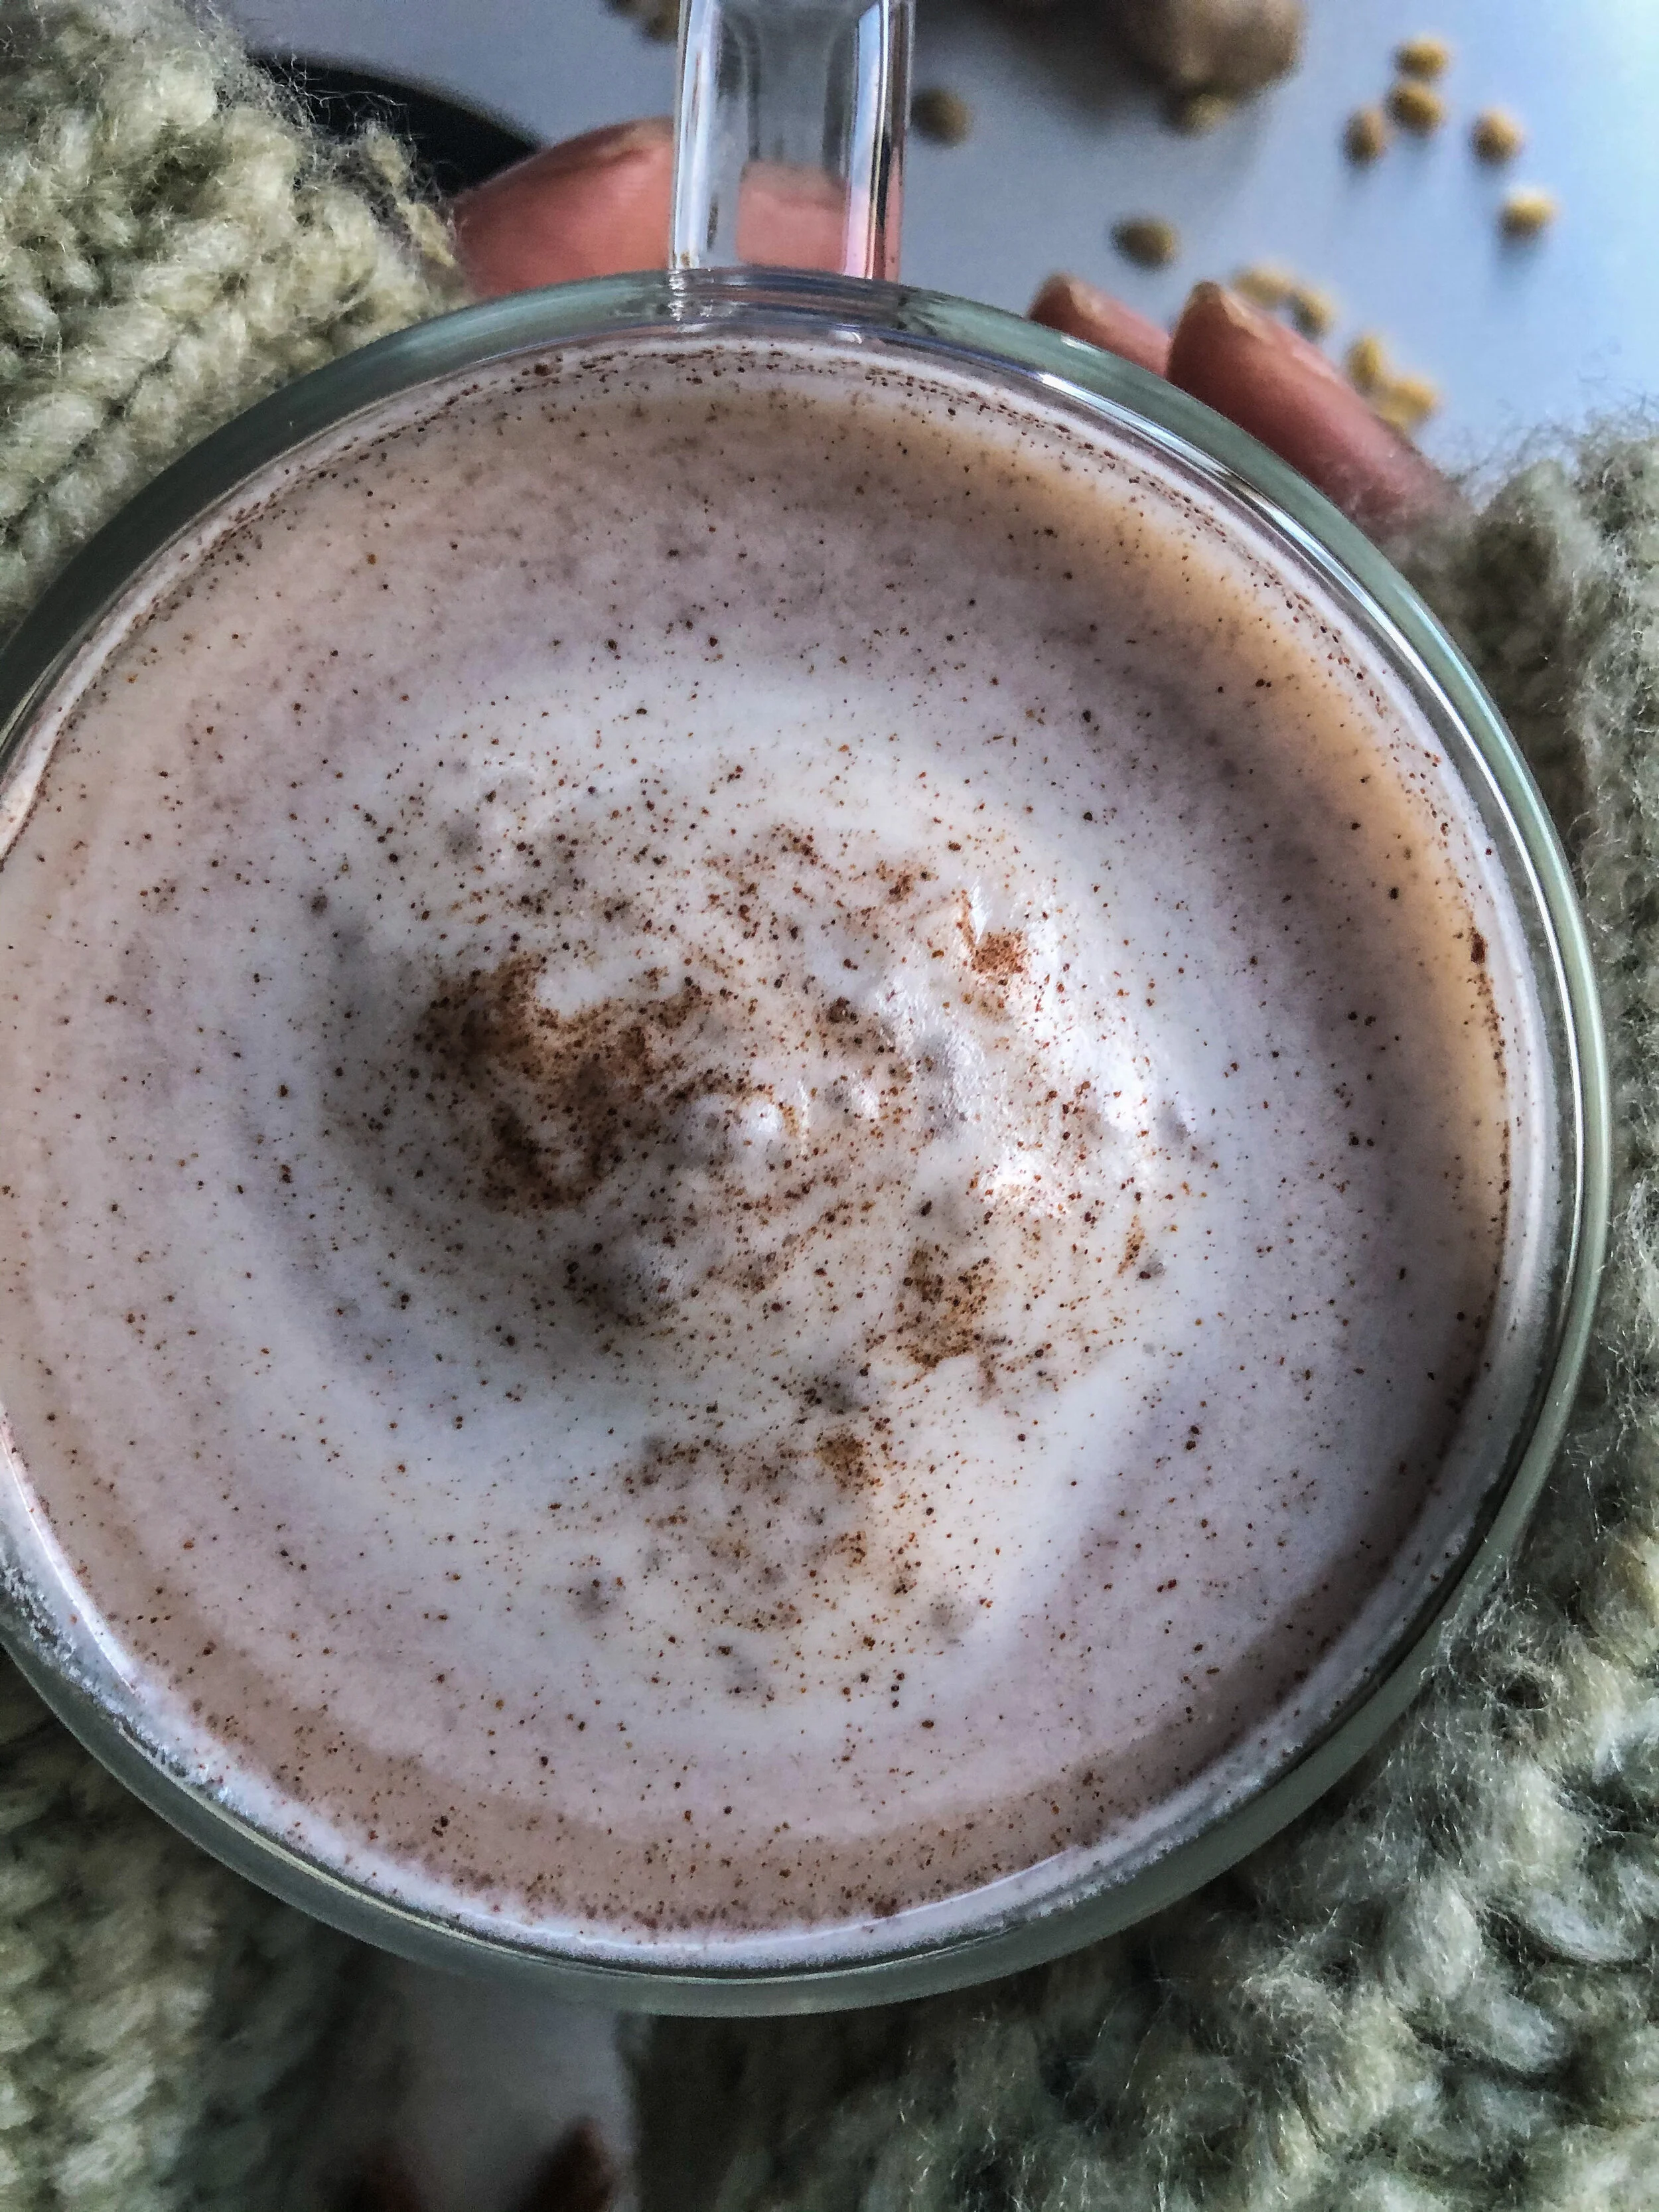
Noona’s Ice Cream Korean Cinnamon Spiced Latte with Noona’s Toasted Rice Ice Cream Flavor.
By: Jessica Delph
You might be drooling at the thought of what the fourth Thursday in November is, but let us try the 15th day of the 8th Lunar month? Does that ring any bells?
Chuseok ( pronounced “choo-suhk”) is here! Chuseok translates to “autumn eve” and is one of the most festive traditional holidays in Korea. The official day this year is September 21st and the celebration lasts for a period of 3 days, including the days before and after the actual Chuseok date( September 20-22). It usually falls between September and October. To keep it simple, we can even call it Korean Thanksgiving, Mid-Autumn Festival or the Harvest Moon Festival.
It is a special time to just celebrate and give thanks for the crops harvested, pay respects to ancestors and to look forward to the new year ahead. In fact, usually this time of year the traffic is so heightened in the city areas because many are trying to leave and make it back home, to celebrate with their loved ones it can become a bit of a battlefield getting home.
How is it celebrated? The family will get together and traditionally wear attire such as Hanbok and celebrate the year's harvest, play games, also celebrate their ancestors by preparing a table of food sort of like an offering. This delicate process is very labor intensive yet oh so rewarding. Oftentimes the women in the family would gather and take the time to make everything needed to set the offering. The meals prepared ideally have to be set in a particular order from East to West and drink.
There are dishes such as jeon ( pan fried pancake: kimchi jeon, gamjajeon) you will find sanjeok jeon on many tables at this time. This particular “pancake” is layered on a short skewer; the layers consist of scallion, imitation crab and beef. It is battered in a little egg and flour after being threaded onto the skewer and then of course fried. Anything fried is a hard yes in my book.
In addition, you will also find what is called songpyeon ( half mooned rice cakes filled with red bean paste, sesame seeds, brown sugar, chestnuts). Depending on the region, sometimes the base ingredients for this sweet treat will vary. Our Noona’s favorite variations are the little green ones made with mugwort.
Other quintessential items include rice from the harvest, asian pears, apples and refreshments. One of my favorite and quite refreshing too is called “Sujeonggwa”.
Sujeonggwa is a Korean cinnamon punch. It can be served hot or cold and also known to aid in digestion which is why it is often served after meals. It’s like a Korean digestif. The stars of the recipe are super simple, yet magnanimous: ginger, cinnamon and your choice of sweetener. Many variations include dried persimmon at the end to soak up the glorious punch. Lets make it !
Korean Cinnamon Punch
Because it is so aromatic, yet so delicious I thought you “PSL” ( Pumpkin Spice Latte) lovers may want to give this recipe a try. It is sweet, refreshing, creamy and a nod to Chuseok.
Not to mention the smell of ginger and cinnamon permatting through your home will set the right tone for fall feels.
Ingredients
Serving Size 10
5 cinnamon sticks, rinsed
¼ of a cup of sliced ginger
1 cup of honey or sweetener of choice ( date sugar tastes especially great in this )
11 cups of water
1 scoop of Noona's Toasted Rice Ice Cream
Garnish
Pine nuts (optional)
Dried persimmon ( optional)
How To Do It
Put ginger into a large saucepan and pour 5 ½ cups of water into the saucepan and bring to a simmer, and continue to do so for about 30 minutes. Pour out the ginger infused water into a heat proof bowl or container. Rinse out the saucepan for the next step.
Repeat step one, except this time with rinsed cinnamon and pour remaining water over. Let the cinnamon simmer for about 30 minutes (see pro tip ₁)
Once you have your ginger and cinnamon have boiled boil separately, get a larger saucepan or pot( that can hold 11 cups of water), drain the ginger and cinnamon respectively over a sieve and pour into the larger pot
Add your sweetener of choice and let this combined ginger, cinnamon concoction simmer for an additional 10 minutes on medium to low heat. Make sure all sugar is dissolved.
To serve simply, you can either let the mixture cool down for a couple of hours before serving and top off with ice ! or Serve in a tea cup and place a dried persimmon in the middle, after this sits for an hour or so, the persimmon will soften and release its fruity flavor you can garnish with even more persimmon or pine nuts.
Take a big heaping scoop ( or two) of Noona’s Toasted Rice flavor and put it in a serving cup. Pour cinnamon punch over ice cream ( hot/cold) , use a spoon and mix until ice cream is mixed in evenly.
The added touch of Noona’s Toasted Rice rounds out the cinnamon and ginger flavors, and I dare say is my new fall favorite. Give it a try also Happy Chuseok to you all. Some Chuseok traditions might have shifted a bit, especially with the happenings of last year but at its core Chuseok is a time for families to get together and be thankful.
Pro Tip
It is said that the ginger and cinnamon should be boiled separately to maximize the flavors and aromas, however if you are short on time go ahead and boil the cinnamon and ginger together for a total of 45 minutes and skip to step 3.
Persimmon season is here ! locally the stores are slowly being stocked with them, if you have trouble finding some dried whole persimmon in your local market like I did and too really commemorate the Sujeonggwa spirit, I highly recommend joining our Noona Test Club Kitchen and pre ordering our new flavor Persimmon Jubilee !
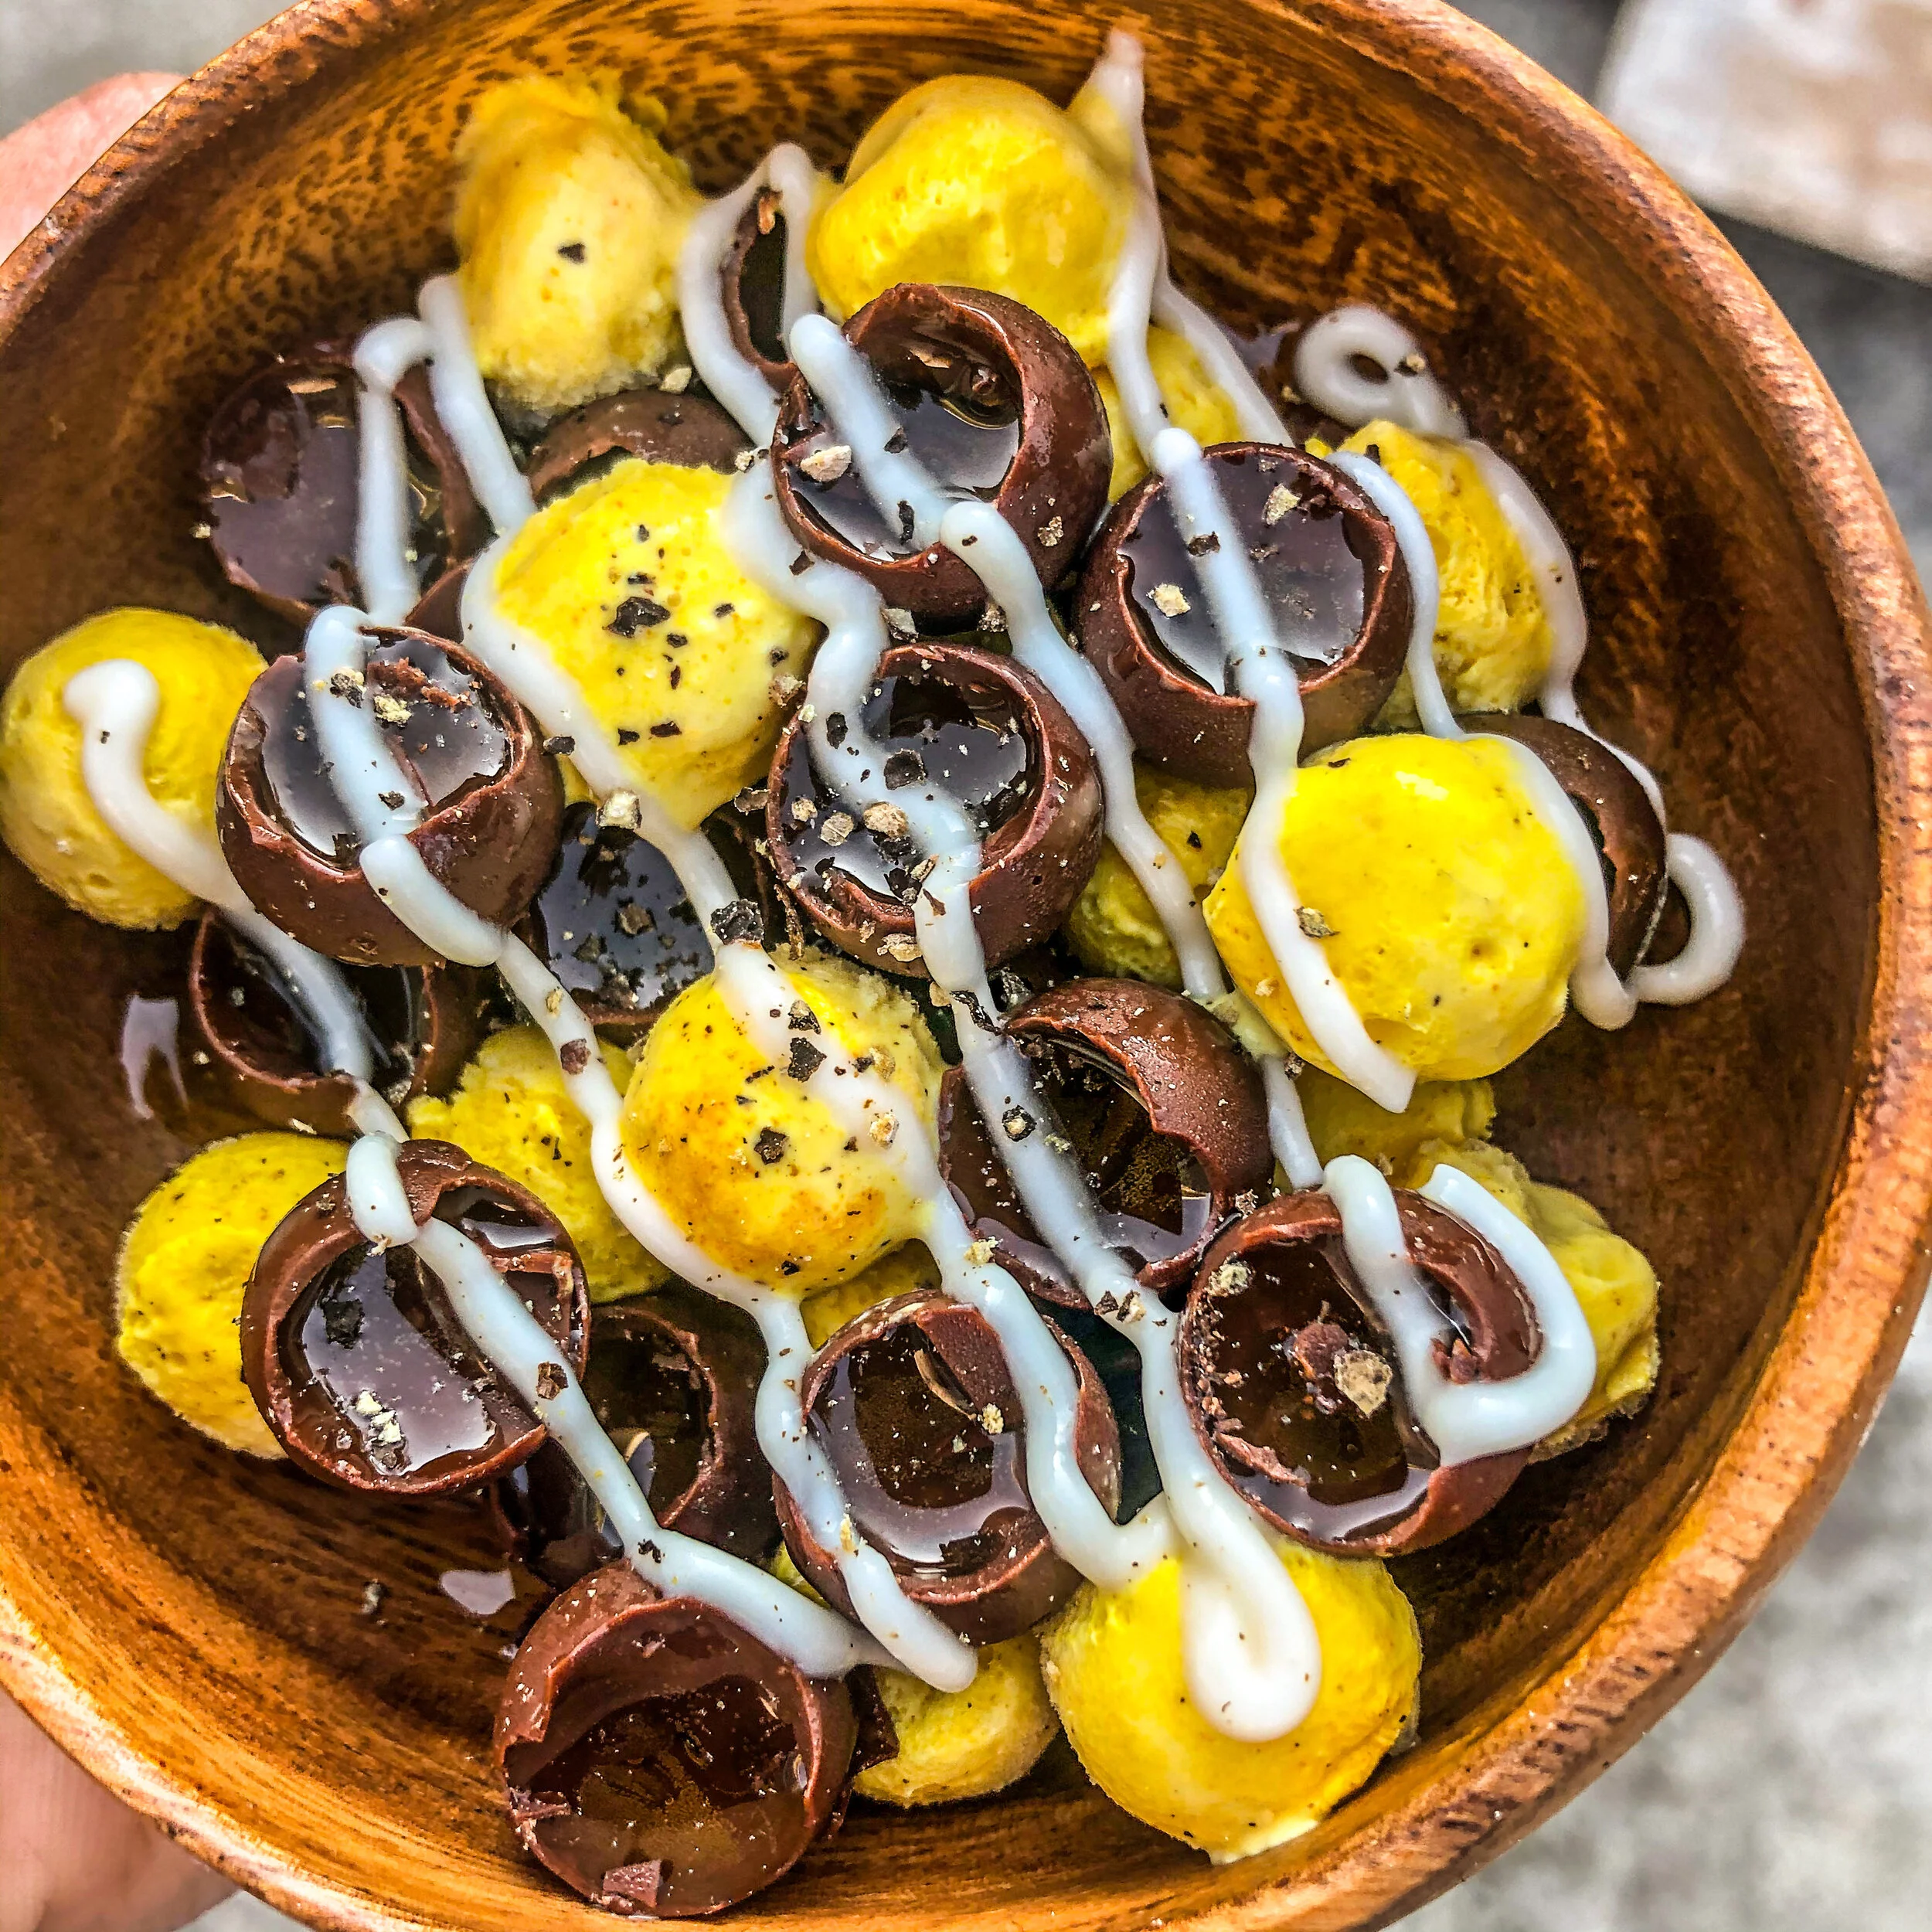
Honey and “Little Miss Sunshine” Dippin Dots
Noona’s Ice Cream Dippin Dots. This Features Noona’s Turmeric Honeycomb Ice Cream with chocolate and honey!
with Noona’s Turmeric Honeycomb ice cream
By: Jessica Delph
Dippin Dots, have you ever had a spoonful ? Dippin Dots are a bit of an ice cream novelty, they have been around for quite some time. Dippin Dots are tiny beaded ice cream spheres that have been flash frozen at extremely chilling temperatures. If you can imagine a bowl of perfectly shaped ice cream pearls then you are on it! These dots come in a few different flavors, and what made them so fun to eat was of course their shape, but also because it is a light, cool treat when you are on the go. For me, it is a bit of a nostalgia trip as my family and I would take trips to amusement parks every summer and that was our go to treat. They were easily accessible at malls, amusement parks and baseball games.
This recipe is going to revisit this old school ice cream novelty, with a little added touch of honey. Now I have been a little intrigued by the “ Frozen Honey Challenge”. The frozen honey challenge has taken the internet by storm but what exactly is it? Honey is poured into an empty water bottle and left to freeze for 2-3 hours. What are the results ? a gummy, gooey bite of nature's candy (sounds amazing). It is all the rage this summer, honey does not contain much water so it will not freeze as the temperature reaches the freezing point. It will remain “honey like” in character which is why I think the idea is so fun ! We tried it, although ever so sweet and delicious, let us give this trend a boost and a bit more balance to make it that much more enjoyable.
In comes the mash up you never knew you needed, We have taken Noona’s “ Little Miss Sunshine” Turmeric Honeycomb ice cream , semi sweet chocolate to balance the texture and flavor of the viscous frozen honey. Let’s go !
Tools
Mini ice ball mold tray silicone: size: 243*121*20mm (9.5*4.76*0.78 inch)
Ingredients
1 scoop of “Little Miss Sunshine” or Turmeric Honey Comb
6 oz of Semi Sweet Chocolate chips
1- 2 tbsp of Clover Honey
1 tsp of coconut oil
For The Honey Ricotta Drizzle
1 tbsp of ricotta
1 tbsp of Clover honey
How to do it
1.) Take out Noona’s Turmeric Honeycomb ice cream and let it stand for about 5 minutes.
2.) While waiting for ice cream to drop down in temperature, pour the chocolate chips in a microwave proof bowl and microwave for 30 seconds. You will want to take out and stir with a spatula or spoon, repeat this step until the chocolate has evenly melted.
3.) Mix chips and make sure it is evenly melted, we will add coconut oil ( this will help the chocolate harden a bit faster and thicker). Pour chocolate in a measuring cup.
4.) Once chocolate has cooled a bit, it is time to use the silicone mold ! We want to almost fill the cavity with chocolate. To make sure there is no spillage, I chose to use the painting method. With a tiny paint brush I dipped it in the melted chocolate and painted the ice mold right up until the top! If not, just pour a little chocolate in at a time, and tilt the mold side to side ensuring that the chocolate coats each sphere evenly.
5.) Keep repeating step 4 until half the mold is chocolate filled.
6.) Next up, to fill the other side of the mold. Take a small spoon or an individual chopstick and spoon Noona’s Turmeric Honeycomb ice cream into an ice sphere mold. If you want to double the recipe, go for it!
7.) One silicone molds is full of ice cream, pop in the freezer and let sit for an hour.
8.) Take mold out of freezer, the chocolate side should be firm and hardened, what you will do now is fill the tiny space we left open with honey( straight from the honey bottle). Just the chocolate, make sure all spheres are topped off and then pop back in the freezer for 1-2 hours or if need be, overnight.
9.) This is the fun part ! You can now get a fancy serving bowl (or your hands ready), take mold out of the freezer. Let sit for 5 minutes on the countertop.
10.) Invert the mold and pop finished product out using your forefingers and thumbs ! And serve in a lovely bowl or cone even ! It’s that simple !
Topping: Honey Ricotta Drizzle
Mix the honey and ricotta together vigorously with a fork or whisk until it is the texture of icing sugar, take a spoon and drizzle all over dippin dots ! This takes the dessert up just a notch. For extra pep in your step try a crack of fresh black pepper !
Why don't you try this on for size, dippin dot from your childhood ? Frozen honey challenge 2.0 ?It is a little of both.
Pro Tip
If you do not have a mini sphere silicone available you can purchase it easily online. Or, optionally take the smaller side of a melon ball scooper. Scoop satisfactory amounts of Noona’s Turmeric Honeycomb in a bowl and drizzle with the melted chocolate AND honey ricotta drizzle ! easy peasy.

Noona’s Turmeric Honeycomb ice cream and honey filled chocolate Dippin Dots with a honey ricotta drizzle